How to publish to a test URL or export your project
When experiencing an issue or conflict and contacting 1LD support, providing a link to the page in question can prove to be quite helpful. That way our support team can troubleshoot the issue by inspecting the website. The two tutorials below will help you get our support team what they need to help. First we will need to figure out which method is best.
Do you have hosting and a domain name and your site already published?
If your website project is already live/published, we understand that you may not want to publish your changes just yet as you don’t want the issue to be live on your site. The tutorial “Publish to a test URL” below will show you how you can publish the page in question and set it to not be visible to your page visitors.
Do you have hosting and a domain name but have not published your site yet?
For those who are working on a brand new website project and are able to publish, the tutorial “Publish to a test URL” below can still prove to be helpful. You will not need to duplicate the page as mentioned in step 1.
Are you unable to publish your site?
For those who are working on a brand new website project and are unable to publish, whether it be because you have not obtained hosting/domain name or you are still learning, exporting your site is an alternative way to provide our support team with a way to inspect your website. To do so see the tutorial “Export Your Project” below.
Publish to a test URL
Step 1: Once you have opened your RapidWeaver project, duplicate the page in question by right clicking (or ctrl + clicking) on the page title.

Step 2: Then navigate to the page and open the Inspector > General Settings tab. Uncheck “Show in navigation” which will remove the page from your navigation menu.
Step 3: Now create a unique name to put in the “Folder” field (IE testing).

What this does is create a duplicated page that can only be found by typing the address into the browser’s address bar. After you publish your site, no wandering visitors will be able to see the page that is still in development. If you are unable to publish your site for some reason, exporting the project may be another option for troubleshooting, see the tutorial “Export Your Project” below.
Export Your Project
Step 1: Once you have opened your RapidWeaver project, click on File dropdown menu and select “Export Site…”

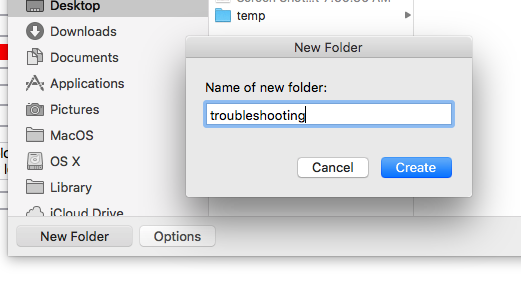
Step 2: In the Export Site menu navigate to the location you want to save your exported website, in this example we will be saving it to the desktop. Then Click the “New Folder” button in the bottom left corner and give the folder a name.
Step 3: After clicking the “Create” button click on the “Export” button.
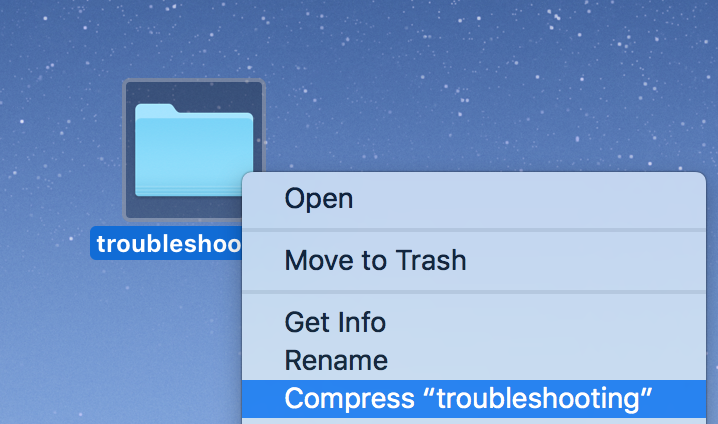
Step 4: Now locate your newly created exported project where ever you have saved it. Once you find it, right click (or ctrl + click) the folder and select “Compress” from the menu. This will create a compressed copy of your website that you can now add as an attachment to an email.