Tutorials

Linking a video

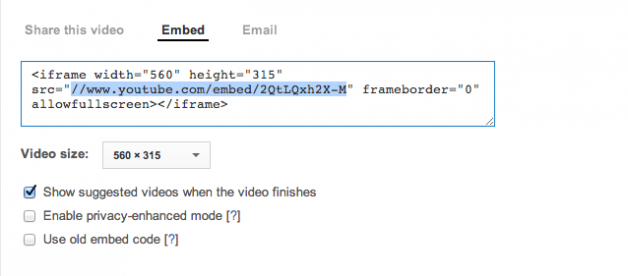
Step 1: Find the video that you want to use and click share.

Step 2: Copy the link like shown in the image below. The link must not contain the “” or it will not work only what is within the “”.

Step 3: Paste the code into the Video Id section in the YoutubeConnect options in stacks.  After that enjoy your video.

videoID


Define Terms

Width: The width determines the size that you want it to display on the page. It ranges from 200px all the way up to 6000px.

Full Width: This will allow you force the size to fit whatever it’s containing the stack is or site.

Video Id: The link that is in the embed code for any Youtube video goes into here. This will link the video and allow it to be playable.

Control Display: This will toggle the controls for the Youtube player

Auto Hide: The will hide the controls or video info a second after the start of the video

Youtube Icon: This will hide the Youtube icon if you have have the controls, but if you have the controls off then the icon will appear no matter what

Annotations: This will toggle the annotation that are made by the user of the video

Video Info: The will toggle the info that is displayed on the top of the video

Relative Videos: The will toggle whether relative videos will be show after the video.

Start Time: The time that you want to video start can be determined with the Start time, but it only works on the first initial play. If repeat is clicked it will go to the very start of the video

Auto Play:  The will toggle whether the video will play automatically when the page loads.

RapidWeaver Stack Tutorials

RapidWeaver Theme Tutorials

RapidWeaver Project Documentation

Tutorials and documentation for all 1LD Project files can be found at the link below.

See Documentation

Get the power of a framework, for the price of a theme, in the convenience of a prebuilt RapidWeaver project file

Blog

Movable Windows

Move beyond the confines of static content layouts! Movable Windows allows your page visitors to effortlessly drag and reposition custom content windows anywhere in the browser viewport. Windows can be minimized to free up space and stay fixed to the browser viewport so they are always accessible.

Resize & Minimize

Windows can be resized to take up more or less space, or maximized to fill the entire screen. But that’s not all – these windows are like handy sidekicks, always ready to assist. Need quick reference? No problem! Windows can be minimized when not in use, saving precious screen space for what really matters – your page content.

Inline

Open windows stay fixed on screen so they are always accessible. Minimized windows have three modes to choose from. “Inline” keeps it in line with other content, “Fixed” is always on screen, and “Draggable” lets you move it around while minimized.

Customizable

It’s not just about functionality; it’s about style too. Customize your windows by size, position, and color. Add in text, images, forms, links – you name it! Want a little more flair? Allow window resizing, choose whether they start minimized or open, change the toggle icon, or hide the window title when minimized.

Check it out!


© 2011 One Little Designer, 1 Little Designer (1LD)

RapidWeaver is a trademark of Realmac Software