Adding a Moderator (comments)
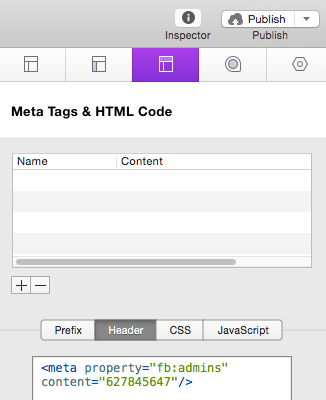
Step 1:
Install the snippet provided with this stack in the Inspector > Header > Header section. Then close and restart rapidweaver.
Step 2:
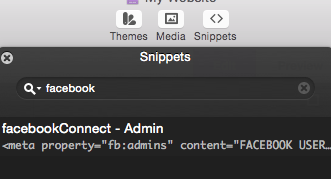
Next, open up your snippets by clicking snippets here:
![]()
This will bring up another pop up window that looks like this:
Step 3:
Drag the “facebookConnect – Admin” snippet over into the header as seen in the screenshot in Step 1.
Step 4:
Now we need to replace “FACEBOOK USER ID” with your actual user ID. I’ve built a tool for finding your Facebook User ID here: Facebook ID Tool.
If you are logged into Facebook, it will automatically show you your user id. If not, it will prompt you to login, but if you don’t log in, you can still type in your Facebook username (or someone else’s) to get the user ID. There are also instructions on the actual site.
Step 5:
Now just copy and paste your Facebook User ID into the snippet, and it should look something like this:
<meta property=”fb:admins” content=”1234567890″/>
Comments
Comments remain on whatever page your assign them too and can be removed by moderators. If commenters select the “Show on Facebook page” checkbox and make a comment it will only appear on their personal page and not on your Facebook page.
Theme:
Light or Dark theme available. This changes the background color and text color of your Facebook comments section.
URL:
This should be the URL for the site that the comments stack will be on. So for instance, if there were a facebookConnect comment stack on this page, the URL would be – http://forum.onelittledesigner.com/tutorials/kb/facebook-connect
Sort Posts By:
Chronological and reverse Chronological will display the comments in the order they were submitted and reverse order, respectively. Social will boost comments that have more likes and replies to the top.
Show # of Posts:
This option controls the number of comments that are displayed when the page first loads, then at the bottom there will be a button for viewing more comments.
Max-Width:
Allows you to define a maximum width for this stack. If left empty, it will always scale to 100% of the width of it’s containing element.
Buttons
Like, Send, and Follow Button Check Boxes:
Checking a box will show the button, and leaving a box unchecked will remove that button from the page.
Like/Send URL:
This should be the URL of the page that the stack is on, as this will cause them to like and/or send your actual website.
Follow URL:
This should be the URL of your own personal Facebook profile page. Business pages to not support the “follow” feature, only personal Facebook pages. You must turn on the ability for people to follow you @www.facebook.com/about/follow.
Theme:
Light or Dark theme available. This changes the background color and text color of your Facebook buttons.
Show Faces:
Checking the box will show your friends profile pictures who have liked or followed this page. Leaving it unchecked will only display text with no images for your buttons.
Layout:
Layouts include Standard, Button Count & Box Count. Each have a slightly unique look to them and take up different amounts of spacing.
Button Order:
Side by Side will display the buttons horizontally, Up and Down will display the buttons vertically.
Font:
You can choose which font you would like the text to display in. Default is Tahoma, the font used on Facebook.
Like Verb:
The Like button can either say “Like” or “Recommend”.
Width:
Allows you to define a maximum width for this stack. This does not effect the size of the images, only the length of the text. This is most useful for the Standard Layout, with Side by Side.
Embed Post
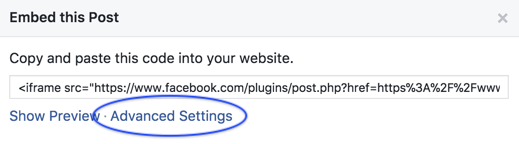
Embedding posts allows you to place any public Facebook post on any website page.
When you see the Embed screen, click the Advanced Settings then copy the URL of the post.

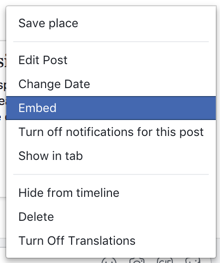
Select the down arrow on the top right side of the post you wish to embed and select the option (if it’s not available then the post has been made private and can only be viewed on Facebook).
Embed Page
To embed a Facebook page simply select the URL of that page and place it in the URL input field.
Show Page Cover is selected by default and shows the cover image of the Facebook page.
Show Faces will show people the visitor knows who also likes/follows that Facebook page.
Show Latest Post will show your most recent post.
Note: Facebook Pages should not be confused with Facebook profile pages. Facebook does not allow you to embed personal pages and only fan style pages that allow you to “like” them.