blog-tutorial-post-template

Tutorials

Setup & Settings Panel Breakdown

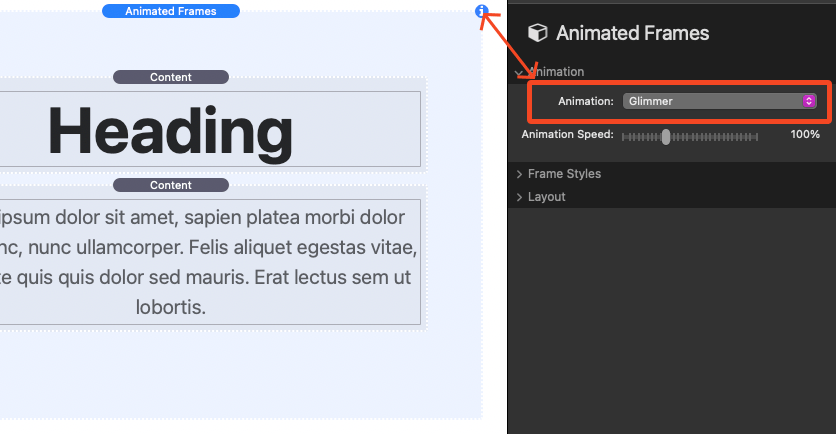
Setup is mostly straight forward. After adding the stack to the editor you can add just about any kind of content to the stack. Then simply select one of the Animation options from the  Settings Panel > Animation section. Each option has an Animation Speed setting to adjust how fast the design animates.

Frame Styles

Mode

Adjust the overall contrast of the design to fit the brightness of the page background. “Light” is recommended for pages that have light color backgrounds and “Dark” is recommended for pages that have darker color backgrounds.


Frame Color

There are three color options to choose from:

Color: Define a sold color for the frame.
Gradient: Define a 2 color gradient that applies across the frame.
Image: Add an image that applies across the frame. This option includes optional settings to define a Frame Color, add a transparent Overlay Color, and apply a Blur effect to the image.

Opacity

This slider adjusts the transparency of the frame.

Frame Width

Adjusts the thickness of the frame.

Frame Radius

Adjusts the corner rounding of the frame.

Layout

Frame Width

Using to the “Define” option will allow you to set a max width for the frame. The frame will automatically be centered in the available space.

Content Width

Using to the “Define” option will allow you to set a max width for the content inside the frame. The content will automatically be centered in the available space.

Margin

Adjust the space around the frame.

Padding

Adjusts the space inside the frame around the content.

RapidWeaver Stack Tutorials

RapidWeaver Theme Tutorials

RapidWeaver Project Documentation

Tutorials and documentation for all 1LD Project files can be found at the link below.

See Documentation

Get the power of a framework, for the price of a theme, in the convenience of a prebuilt RapidWeaver project file

Blog

Movable Windows

Move beyond the confines of static content layouts! Movable Windows allows your page visitors to effortlessly drag and reposition custom content windows anywhere in the browser viewport. Windows can be minimized to free up space and stay fixed to the browser viewport so they are always accessible.

Resize & Minimize

Windows can be resized to take up more or less space, or maximized to fill the entire screen. But that’s not all – these windows are like handy sidekicks, always ready to assist. Need quick reference? No problem! Windows can be minimized when not in use, saving precious screen space for what really matters – your page content.

Inline

Open windows stay fixed on screen so they are always accessible. Minimized windows have three modes to choose from. “Inline” keeps it in line with other content, “Fixed” is always on screen, and “Draggable” lets you move it around while minimized.

Customizable

It’s not just about functionality; it’s about style too. Customize your windows by size, position, and color. Add in text, images, forms, links – you name it! Want a little more flair? Allow window resizing, choose whether they start minimized or open, change the toggle icon, or hide the window title when minimized.

Check it out!


© 2011 One Little Designer, 1 Little Designer (1LD)

RapidWeaver is a trademark of Realmac Software