How To Set Up the Slider
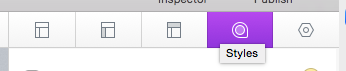
Step 1: Navigate to your Page Inspector > Styles Menu and enable the Slider by selecting ‘Slider’ under the Banner Setting option.
![]() ->
->  ->
-> 
Step 2: View your project in Edit mode by clicking the edit button.
![]()
Step 3: Import or drag and drop an image into your editor.
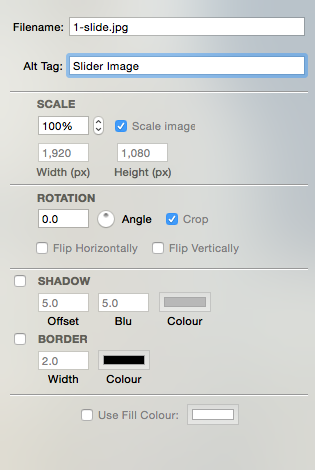
Step 4: Double click the image and in the popup menu change the Filename to something that includes the word ‘slide’.
Step 5: Repeat steps 3 and 4 until you have as many images you want to use in the slider. Affero’s Slider will now do the rest! The order you place your images into the slider, is the order the slider will display them.
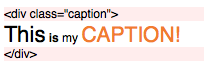
How to Add Captions to Your Slider
Step 1: View your project in Edit mode by clicking the edit button.
![]()
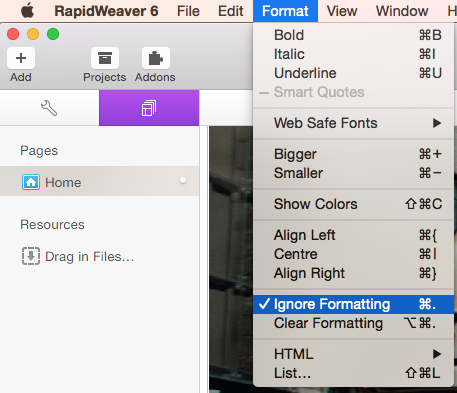
Step 2: Copy and paste the code below into your editor. Step 3: Highlight the code you pasted and select “Ignore Formatting” from the Format drop-down menu.
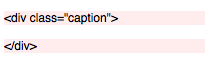
Step 3: Highlight the code you pasted and select “Ignore Formatting” from the Format drop-down menu.
Step 4: Now highlight the white space between the code and select “Ignore Formatting” again. This is so you can use RapidWeaver’s formatting tools on the caption (e.g. change color or font-size)
Step 5: Add your desired caption in the white space between the pink highlighted code.
Step 6: Repeat Steps 2-5 until you have your desired number of contents. Just like the slide images, the captions will display in the order that you place them. If you want to leave one slide without a caption just don’t add text in between the pink highlighted code.
NOTE: Sometimes the editor will change your “ straight quotation marks into ” curly quotation marks. The curly quotation marks will cause caption to not work. To change them from curly to straight just delete the quotes and retype them.
How to Add Videos (iframes) to the Slider
Step 1: View your project in Edit mode by clicking the edit button.
![]()
Step 2: Copy and paste the code below into your editor.
<li class=”slide”>
</li>
Step 3: Highlight the code you pasted and select “Ignore Formatting” from the Format drop-down menu.
Step 5: Locate the video you want to use on Youtube or Vimeo. Use the share link “Embed” option to get the iframe code. Paste the iframe code into the space between <li class=”slide”> and </li>


NOTE: Sometimes the editor will change your “ straight quotation marks into ” curly quotation marks. The curly quotation marks will cause caption to not work. To change them from curly to straight just delete the quotes and retype them.
How To Enable Lightbox on an Image
Step 1: Navigate to your Page Inspector > Styles Menu and enable the Lightbox by selecting checking the ‘Lightbox On’ checkbox under the Toggles heading.
![]() -> ->
-> -> ![]()
Step 2: View your project in Edit mode by clicking the edit button.
![]()
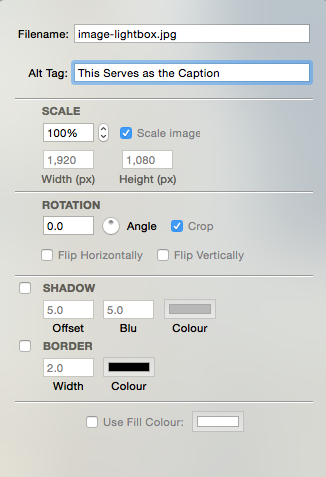
Step 3: Import or drag and drop an image into your editor.
Step 4: Double click the image and in the popup menu change the Filename to something that includes the word ‘lightbox’. You can also change the Alt Tag to set what will display as a caption for the image.
How To Add A Button
Step 1: Type in your desired button text into your editor and hightlight the text.
![]()
Step 2: click the Add link button.
![]()
Step 3: Add a link to where you would like the button to navigate to and then add a ‘class’ with the value ‘button’.
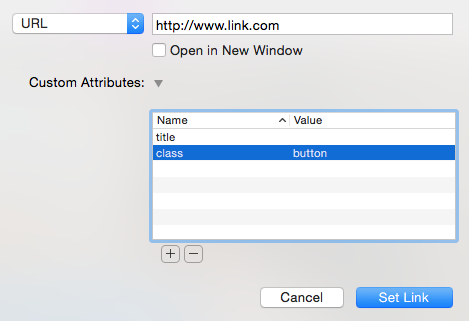
Step 4: Click ‘Set Link’ and you are done.