Pattern Maker Canvas Breakdown
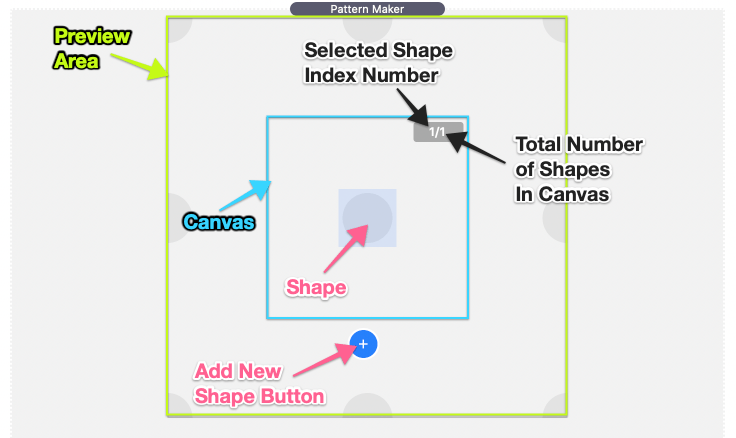
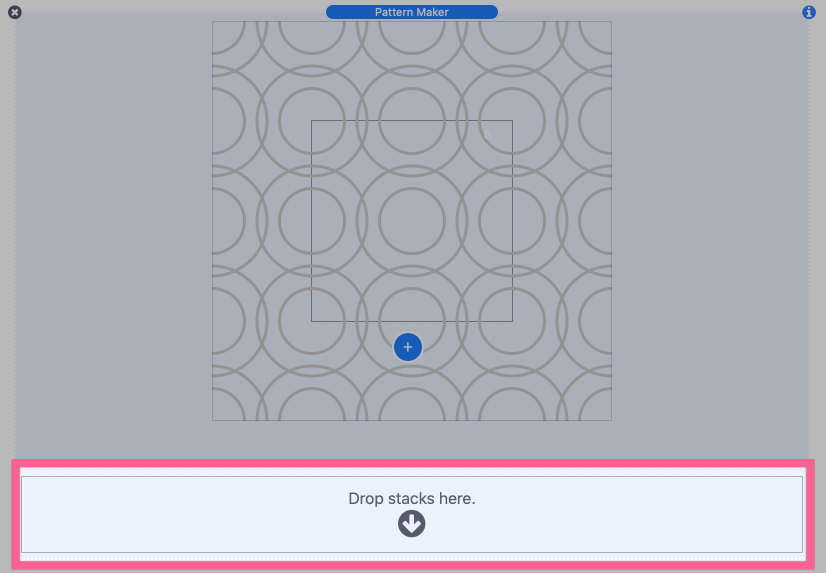
After adding the Pattern Maker stack to the editor you will see a Canvas above a “Drop stacks here” section. This canvas is where you are able to design a new pattern. The canvas is surrounded by a Preview Area that allows you to see the pattern duplicated in every direction.
Initially, a single circle shape is added to the Canvas in the center. When you select a shape by clicking on it, a number representing its Index out of the Total number of Shapes will show in the top right. More shapes can be added by clicking the Add New Shape Button or by copying and pasting (Cmd+c Cmd+v) a shape that is already in the canvas.
Adding Content
The Pattern Maker stack is for creating background patterns and requires content to where the pattern will be applied. And any stacks content to the “Drop stacks here” section and the pattern will be used as the background for that content.
You may also instead download the created pattern as an image that you can use anywhere images are accepted, most notably in any other stack that allows you to add background images. Learn more about how to download a pattern you have created in the “Downloading a Pattern Image” tutorial below.
Selecting and editing a shape
You can select a shape simply by clicking on it. If a shape is overlapped by another and you are unable to select it, you can use the arrow keys to navigate through the shapes by index number.
Open the Inspector to see the shapes settings panel.

Shape Settings Panel Breakdown
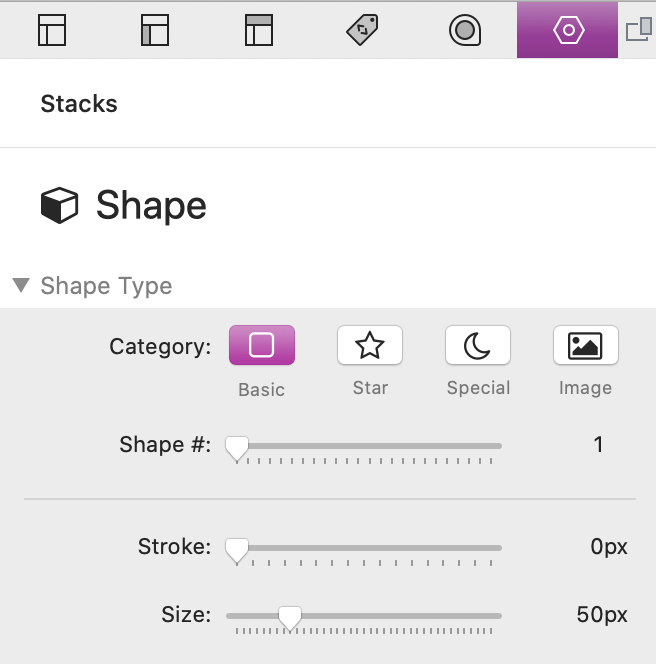
Category
Select from 3 different shape categories. There is also an option to use an image instead of one provided shapes.
Shape #
Each shape categories has 24 different shapes to choose from. Use this slider to select a shape.
Stroke
Increase the stroke of a shape to switch between solid and outlined shapes. Every value over 0 defines the width of the stroke.
Size
Adjusts the overall size or scale of the shape in pixels.

Color
Select from 3 different color categories. The Major, Minor, and Accent categories are defined in the Pattern Maker stack settings panel. You may also optionally define a custom color for the selected shape.
Shadow Color & Spread
If the shadow spread value is greater than 0 a shadow will display around the edges of the shape spread out by the defined pixel amount. Use the shadow color option to change the intensity and color of the shadow.
Blur
If the blur value is greater than 0 the entire shape will blur by the defined pixel amount.

Left/Right & Top/Bottom
Adjust the position of the shape in the canvas. Shapes are positioned by a pixel value based on an origin at the center of shape. The canvas is 200×200 pixels in size, though the size it displays at when published and in preview is defined in the Pattern Maker stack settings panel.
Rotate
Adjust the rotation of the shape in degrees.
Z-index
Adjust the stacking order of the shapes relative to one another. Higher z-index values will display on top of lower z-index values.
Pattern Maker Settings
Select the Pattern Maker stack and open the Page Inspector – settings panel.

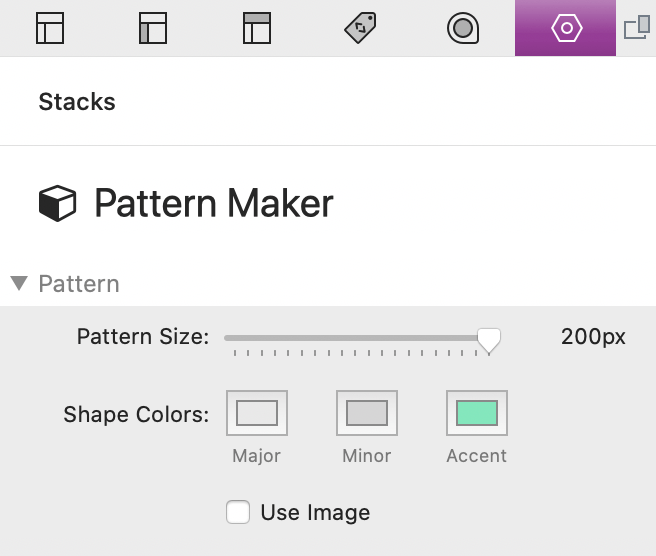
Pattern Size
Adjust the overall scale and size of the created pattern. The pattern size can only be viewed when published or by switching to preview mode.
Shape Colors
The Major, Minor, and Accent color categories can be defined here. These colors can be applied to individual shapes by selecting a shape and clicking on a color category in the settings panel.
Use Image
Enable this option to use a pattern image instead of the pattern currently in the canvas.
Downloading a Pattern Image
By default, every pattern you design with the Pattern Maker stack will automatically be converted to a temporary image that will be used as the background for the stack. This temporary image is generated every time the page is loaded. This will not put a significant load our your website but the pattern may take a noticeable amount of time to load if you have multiple patterns throughout the stacks page.
It is recommended that you download the generated pattern image and use it as a background instead. To download a pattern image you will just need to preview the Stacks page by pressing Cmd+p (while the RapidWeaver app is active). Click on the “Download Pattern” button to download the image. If you are using the RapidWeaver preview mode you will need to drag and drop the image into a folder or the desktop.
After downloading the image, switch back to edit mode and select the Pattern Maker stack. In the settings panel enable the “Use Image” setting. Drag and drop the pattern image to apply the pattern. The download pattern button is only visible in preview mode and will not be present on a published website.
Once this is done, the pattern will no longer need to be generated. The downloaded pattern image can also be used anywhere images are accepted.