Setup
To integrate Live Search 2 into your webpage, simply add it to a location where you want it to appear. There’s no need for additional setup; the search function automatically scans the content of pages listed in your sitemap.xml file and displays relevant results whenever the search input is used. Now, let’s delve into customizing its features.
Search Bar Settings
Click on Live Search 2 in the editor and open the settings panel. The search bars settings can be found at the top of the settings panel.
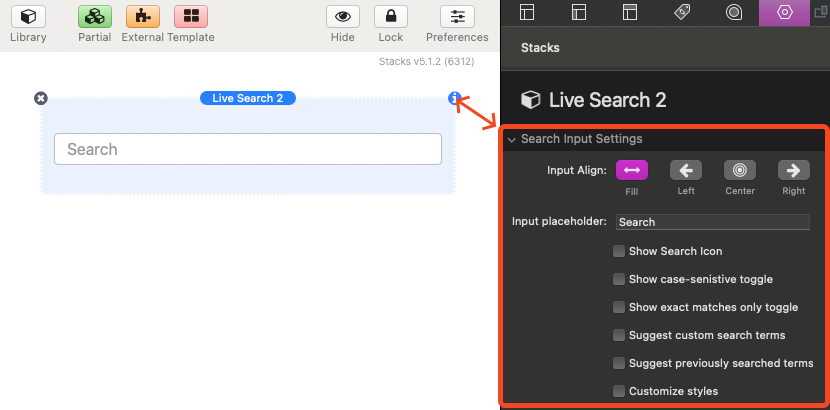
- Input Align: Choose how the search input field is aligned. When using the “Left”, “Center”, or “Right” options you are given a field to define the maximum width of the input field, otherwise the input field will fill the entire available horizontal space.
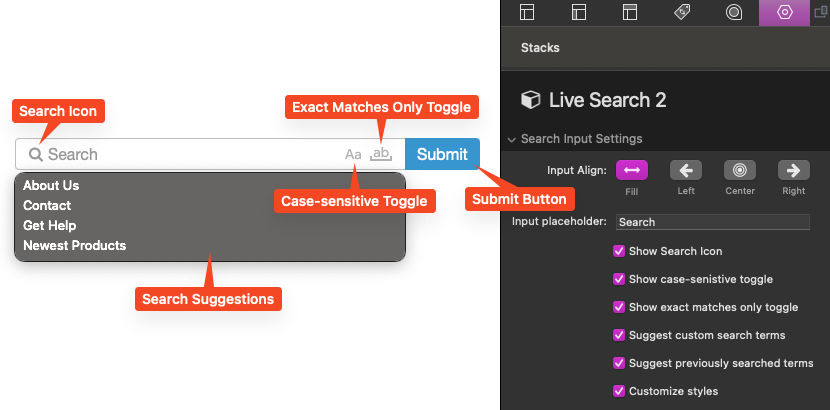
- Show Search Icon: Adds a search icon to the left side of the search input field.
- Show case-sensitive toggle : Adds a clickable toggle to the right side of the search input field. When this toggle is enabled the search function will provide results that match the case of provided search query text.
- Show exact matches only toggle : Adds a clickable toggle to the right side of the search input field. When this toggle is enabled the search function will only provide results that exactly match the entire search query text.
- Suggest custom search terms: Define any number of suggested search terms or phrases. These terms will appear as a drop down selection menu that users can click to automatically populate the search bar. The suggested search terms will also display as they are spelled out in the search bar as a form of auto-complete.
- Suggest previously searched terms: Allow browsers to auto-complete previously searched terms.
- Customize styles: Reveals a “Search Input Styles” section in the settings panel where you can adjust the appearance of the search input field as well as optionally add a submit button.
Search Result Settings
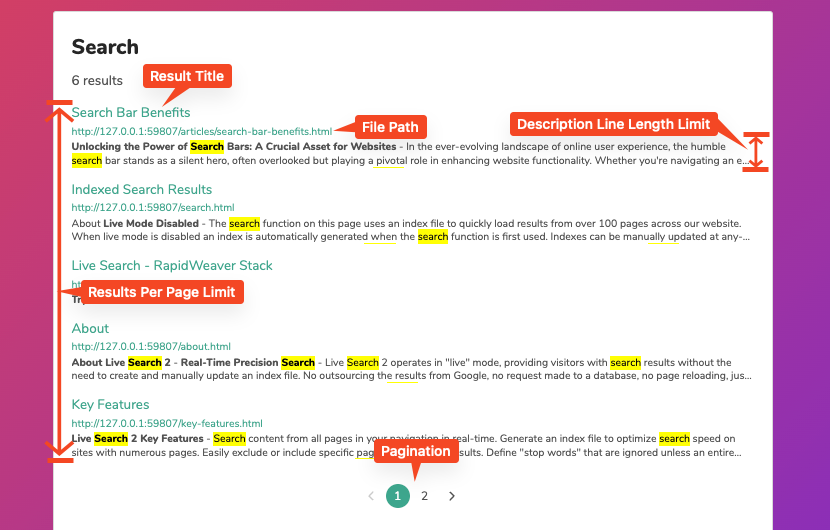
- Results: Define how many results will display before sorting the remaining results into navigable pages (pagination).
- Description: Defines the length in lines of each search result description. The description will be truncated with an ellipsis (…) at the defined line of text.
- Open links in a new window: Forces each search result to open in a new window when clicked.
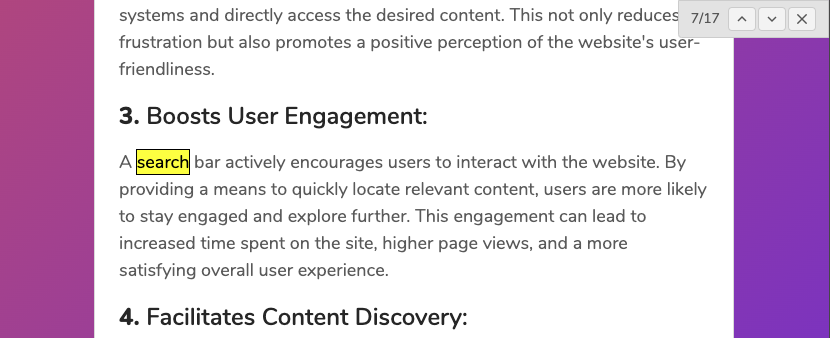
- Highlight & scroll to matched term: Will automatically highlight and scroll to any matched terms after navigating to a search result page. Users can also quickly navigate through the matches and dismiss the highlights.
In order for the highlight function to work, the result page must have a copy of Live Search 2 or Live Search 2 Tool. Learn more
- Show file path: Displays the url of each search result below the title.
- Customize text/language: Reveals input settings where you can modify the language of the search function messages and placeholders..
- Customize styles: Reveals a “Search Results Styles” section in the settings panel where you can adjust the appearance of the search results.
- Theme: Choose between two styles. Each style has a “popover” and “embed” version.
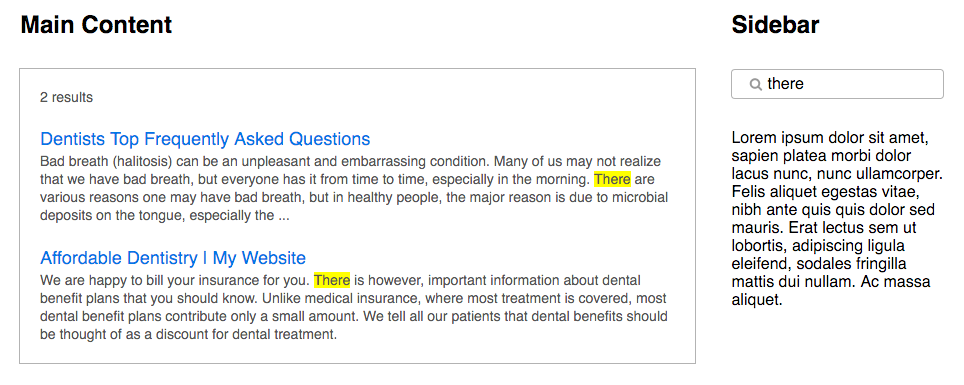
- Popover: The results will not take up any space and will display below the search input field and over the content of the page. The results can be dismissed by clicking off the results.
- Embed: The results will take up space below the search input field. Embedded versions are best for pages dedicated to performing searches. Learn more
- Theme: Choose between two styles. Each style has a “popover” and “embed” version.
Search Function Settings
- Index: Choose whether the search function will scan the website page content and provide live results (“None / Live”) or if an index file will be created to provide static results (“Create file”). Learn more
- Declare search container: Optionally define the location of the searchable text on each page. Learn more
- Search custom sitemap xml files: Optionally provide the urls of custom sitemap.xml files. Any pages listed in these sitemaps files will be add to the pages to be searched or indexed. This is mostly useful for blog posts or other content that is loaded from a database.
- Exclude specific pages: Allows you to list the URLs of pages you do not want to be searched or indexed.
- Search additional pages: Allows you to list the URLs of pages of your website that you want to be searched or indexed. If you find a page is missing from the results you can add the it here to ensure it is searched or indexed. You also have the option to only search or index the listed pages.
- Define common words: Define what words should be ignored in the search function. These words will not return results unless another word is included in the search. These words will also not be highlighted in the search result descriptions unless they are paired with another matched word.
Advanced Settings
- Adjust request limit:
- Live: Defines how many simultaneous requests are made when searching the pages of your website. Increasing this number can improve the speed of the search function. Decreasing this number can reduce the occurrence of errors on websites that have request limits.
- Indexed: Defines how many simultaneous requests are made when creating or updating the index file. Increasing this number can improve the speed of the indexing function. Decreasing this number can reduce the occurrence of errors on websites that have request limits.
- Add description word filter: Define certain words or phrases you do not want to show up in the search result page descriptions. Add a plus symbol and backslash (+\) between each of the listed terms/phrases. Do not add these symbols before the first or after the last term/phrase listed.
- Debug mode: Adds detailed logs to the browser console when the search function is executed. Provides information on what pages are being searched / indexed. Search results will also display a score next each title. This score is determined by the search function in order to determine the order the results are displayed.
Creating a Search Index File
By default, Live Search 2 swiftly scans through all the pages of your website to find matches for a search query. This happens in real time, meaning you get instant results as the pages are scanned. Once this initial scan is done, subsequent searches are super fast and don’t trigger another full scan as long as the page remains open. This mode doesn’t need a database or an index file.
6 page website (No index / Live):
175 page website (No index / Live):

However, if your website has a lot of pages and the search takes too long, you have the option to create an index file. This index file stores information about your website’s content, allowing for immediate search results without scanning pages each time. The drawback is that you need to update this index file whenever your website’s content changes, like adding or removing pages.
175 page website (Indexed):

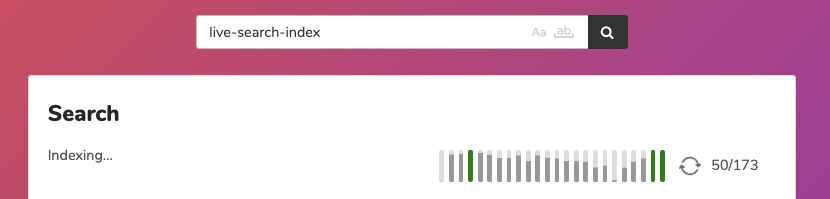
Creating the index file happens automatically the first time you use the search function on your live website. It does a one-time scan of all pages, creates the index file, and saves it. You can update the index anytime by using the search input field and searching for live-search-index.
Redirecting a Dedicated Search Page
The Live Search 2 Tool enables you to include search input fields on pages that direct users to a separate search page rather than displaying results directly on the same page.
Here’s how to set it up:
- Add the Live Search 2 Tool to the desired page.
- Click on the Live Search 2 Tool to access its settings panel.
- In the settings panel, navigate to the “Tool Settings” section at the top.
- Set the “Redirect URL” link to a page containing Live Search 2.
- When users utilize this search input field, they will be redirected to the specified URL and the search results will be automatically displayed on that page.
Show Search Results in a Custom Container
By default, Live Search 2 shows search results right below the search input field. The width of these results matches the available horizontal space of the container. However, if you place the search input field in a narrow container, like a sidebar, the results will also be narrow.
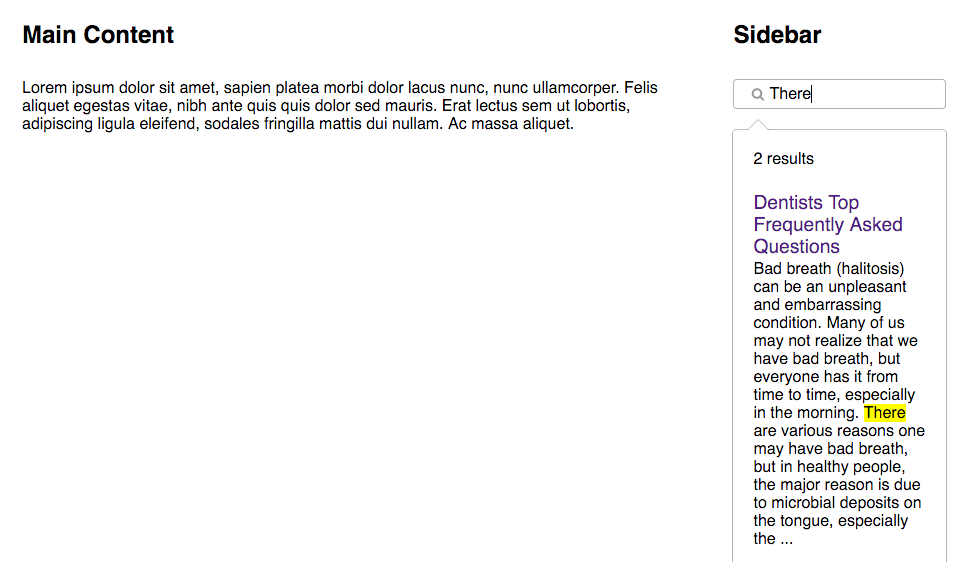
To customize where the results display, you can add the class “live-search-results” to any element you prefer. This allows you to control the location of the results.
- Select the container element where you want the results to display.
- Open the settings panel for that element.
- If the settings panel includes an “HTML” section, you can add the value
live-search-resultsto the “CSS classes” field.
Additionally, for mobile screens, you might want the results to appear in a different location. You can achieve this by adding the class live-search-results-mobile to define where the mobile results should display.
Enabling Highlight & Scroll Functionality
To make the “highlight & scroll to matched term” feature work, you need to have Live Search 2 on every search result page. However, if some pages don’t need a search function, you can use the Live Search 2 Tool instead. This will still give you the highlight and scroll functionality without showing a search input field.
Here’s how to set it up:
- Add the Live Search 2 Tool to the page where you want the feature.
- Click on the Live Search 2 Tool and open its settings panel.
- In the settings panel, go to the “Tool Settings” section at the top.
- Change the “Search Input” setting to “Disabled”. This will remove the search input field, leaving only the highlight and scroll feature enabled for the page.
Search / Index a Section of a Page Separately
You can search specific sections of a page and have them listed separately in search results.
Here’s how to set it up:
- Click on Live Search 2 in the editor and open its settings panel.
- In the settings panel, navigate to the “Search Function Settings” and enable “Search additional pages”.
- Add a new link to the page containing the element or section you want to search to the “Search Additional Pages” section in the editor.
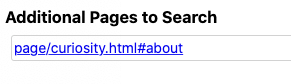
- Ensure that the link to the page is manually added and not selected from a dropdown menu. When adding the link, include a #(hashtag) followed by the ID of the element you want to search. Click here to learn how to obtain the ID of an element.

Defining the Default Searchable Text
If you’re using a particular theme and you’re familiar with the ID or class name of the element containing the page content, you can specify it as the location for the default searchable text on each page. This means the search function will only look within this container for text.
Here’s how to set it up:
- Open the Live Search 2 settings panel.
- In the “Search Function Settings” section, enable “Define search container”.
- In the provided field, add the class or ID name of the element containing the page content. If it’s a class name, prefix it with a period (.), and if it’s an ID, prefix it with a hash/pound symbol (#).
Marking Content as Searchable Text
You can define where the search function looks for text on a page by specifying certain containers.
Here’s how to do it:
- Select the element you want to designate as a container for searchable text in the editor.
- Open the settings panel for that element.
- If the settings panel includes an “HTML” section, you can add the value
live-search-descriptionto the “CSS classes” field.
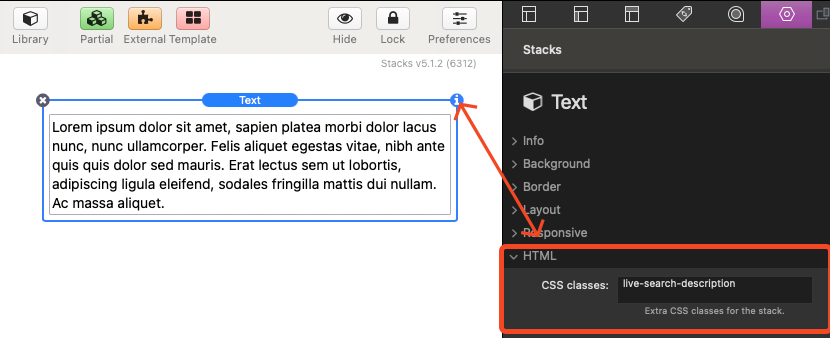
You can assign this class to multiple container elements on the same page.
Excluding Content from the Searchable Text
You can define text content that the search function should ignore by specifying certain containers.
- Select the element with text you want to exclude from the searchable text.
- Open the settings panel for that element.
- If the settings panel includes an “HTML” section, you can add the value
live-search-excludeto the “CSS classes” field.
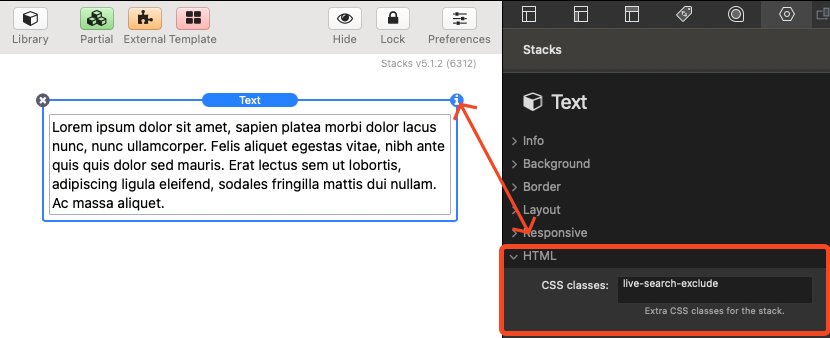
You can assign this class to multiple container elements on the same page.
How to Get the ID of an Element on a Web Page
Using Safari:
- Open Web Inspector: Right-click on the element you want to inspect and select “Inspect Element” from the context menu. Alternatively, you can press
Option + Command + Ion your keyboard to open Web Inspector. - Locate the Element: Web Inspector will open, highlighting the selected element in the DOM Tree pane.
- Find the ID: Look for the “id” attribute within the highlighted element. The value of this attribute is the ID of the element you selected.
Using Google Chrome:
- Open Developer Tools: Right-click on the element you want to inspect and select “Inspect” from the context menu. Alternatively, you can press
Cmd + Option + Ito open Developer Tools. - Locate the Element: Developer Tools will open, showing the HTML structure of the webpage. The element you right-clicked on should now be highlighted in the HTML pane.
- Find the ID: Look for the “id” attribute within the highlighted element. The value of this attribute is the ID of the element you selected.
Using Mozilla Firefox:
- Open Developer Tools: Right-click on the element you want to inspect and select “Inspect Element” from the context menu. Alternatively, you can press
Cmd + Option + Cto open Developer Tools. - Locate the Element: Developer Tools will open, highlighting the selected element in the HTML pane.
- Find the ID: Look for the “id” attribute within the highlighted element. The value of this attribute is the ID of the element you selected.
Using Microsoft Edge:
- Open Developer Tools: Right-click on the element you want to inspect and select “Inspect” from the context menu. Alternatively, you can press
Cmd + Option + Ito open Developer Tools. - Locate the Element: Developer Tools will open, showing the HTML structure of the webpage. The element you right-clicked on should now be highlighted in the HTML pane.
- Find the ID: Look for the “id” attribute within the highlighted element. The value of this attribute is the ID of the element you selected.
If the element doesn’t have an ID, you won’t find an “id” attribute associated with it.