Setup
1. Drag the Siphon Stack into the Stacks editor.
Once the Stack is in the editor, you will see three components. The main Siphon stack wrapping a single Slide stack and an Answer stack inside of the slide. Slides have a thick purple border around them to help keep them visually separated from one another. There are also blue buttons that add more slides to the Siphon stack or add more answers to a single slide.
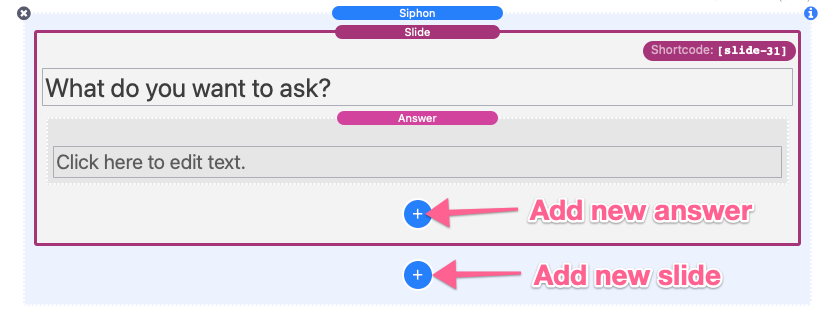
2. Change the text “What do you want to ask?”, found above the answer, and replace it with a relevant question.
In this example we will ask “What is your name?”.
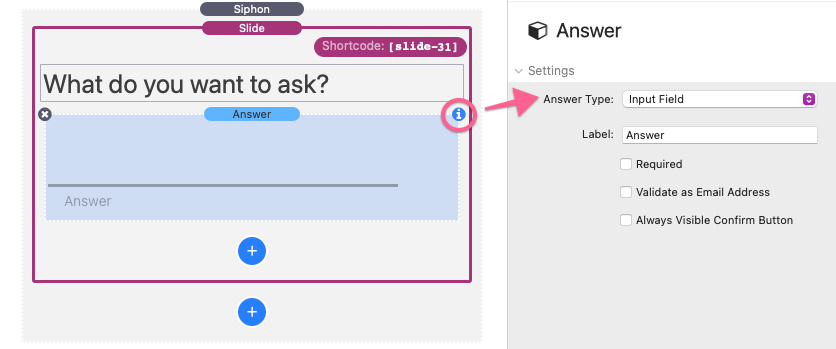
Now we need to set up how the form users will reply to this answer. Since the answer will be unique we need to use an input field. By default the answer is set to “Clickable Content”, to change it:
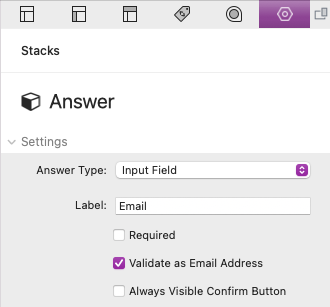
3. Click on the answer stack to bring up its settings panel to the right of the editor. Change the option Answer Type to “Input Field”.
There is also an option to change what the label says underneath the input field. We will change it to “Name”. We will not need to use the 3 remaining checkbox options:
Required – When enabled, form users will not be able to leave the input blank and progress to the next slide.
Validate as Email Address – Enabling this option will not allow the form user to progress to the next slide until they have entered a valid email address format.
Always Visible Confirm Button – Enabling this option will make the confirm / next button visible (Instead of only appearing after the input field has been focused / edited).
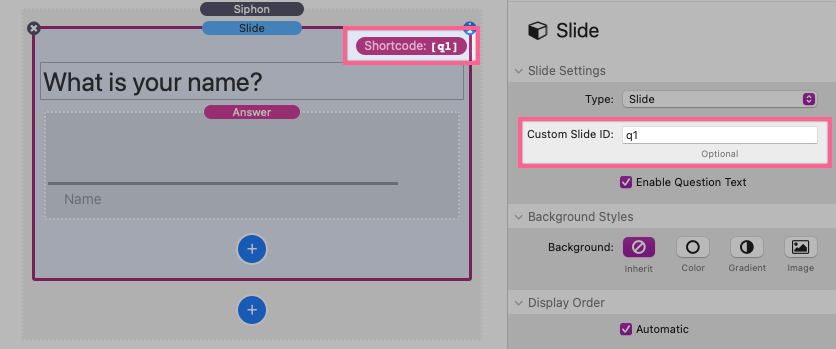
4. Click on the Slide component to pull up it’s settings panel and optionally give the slide a unique Slide ID. Leave Display Order set to “Automatic”, this setting will be described in a later step.
If you do not provide a Custom Slide ID one is generated automatically. It is shown in the top right corner of the slide as inside the brackets of the slide’s shortcode.
The ID can be anything you want it to be, but every slide should have it’s own unique ID. The value is case sensitive and you should avoid using special characters (!@#$%^& etc) with the exception of dashes – and underscores _ .
In this example we will give the slide the ID “q1” (for question 1). The shortcode [q1] we will be using later displays in the top right corner of the slide.
The Enable Question Text checkbox can be used to hide the question text. This is if you would like to use a custom 3rd-party stack to create and style the question text.
Background Styles are cosmetic and optional. They will overwrite the Siphon background styles for the selected slide.
The first slide is now finished and does not need anymore content, but you can add any additional info or Stacks content by dragging and dropping other stacks inside the Slide stack. You could also add more answer input fields if you wanted to get more information from a single slide.
5. Click the Add New Slide button below the Slide stack to add a second slide.
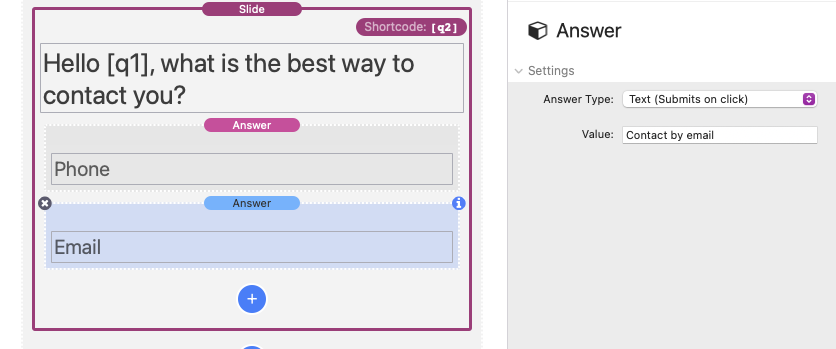
In this slide we can use Siphon’s shortcodes to greet the form user by name. An example of how to do so would be to change the question text to “Hello [q1], what is the best way to contact you?”.
Whenever a Siphon slide answer is filled in or selected, its value is stored inside of a “shortcode” . Shortcodes are made by wrapping the Slide ID in brackets.
[q1]
These shortcodes can be placed anywhere inside following Siphon slides. They will automatically be replaced by the given or selected value.
Now we need to create answers for this second slide. This slide is going to have multiple choice answers, so we can leave the Answer component set to “Text (Submits on click)”.
Submits on click – If a form user clicks on this type of answer, the slide will automatically submit and move to the next slide.
6. Double click the text “Click here to edit text.” and change the value to “Phone”.
7. Click on the answer component to open it’s settings panel and create a Value for the answer.
Unlike the input field, which gets its value from what has been typed in by the form user, “Text” answers do not have a value by default, so one will need to be created. In our example, we will change the value of this answer to “Contact by phone”. When a form user visitor clicks on this answer, that value will be recorded.
To add a second answer, you can either duplicate the phone answer or:
8. Click the Add New Answer button to add a second choice for the form user.
In this answer we will add the text “Email” with the answer value being “Contact by email”.
Just like we did for the first slide we need to:
9. Create a unique Slide ID for this slide.
In this example we will give this slide the ID “q2”.
Note: It’s very important to remember to give each slide an ID. If a slide is missing an ID it can cause errors.
Now we need to show conditional slides according to how the second question is answered. First we will create a slide for people who want to be contacted by phone.
10. Add a new slide. This slide will only display on a condition based on the previous slide’s answer.
For our example the question will be “What number should we use to contact you?”. The answer should be an input field and in our example we are using “q3a” as the Slide ID.
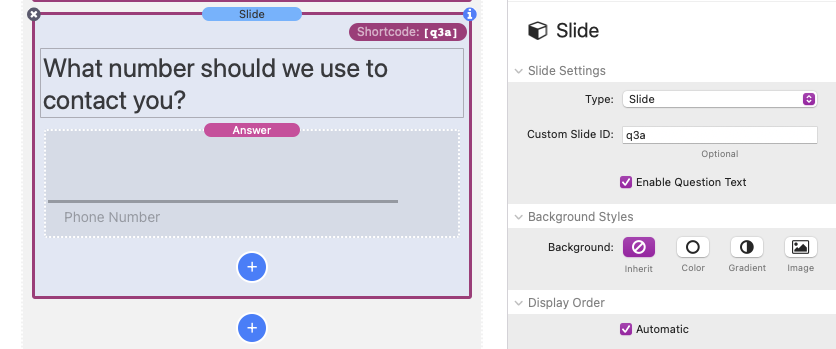
We do not want this slide to display automatically, so:
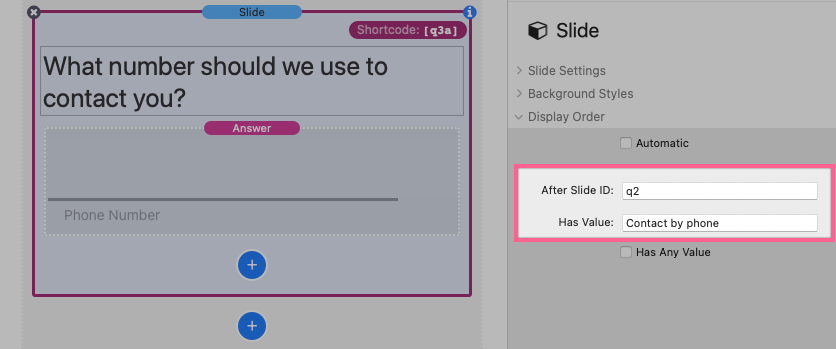
11. In the slide settings panel uncheck the option “Automatic”. Two new fields will appear. To set what slide should come before this one, type in the previous slide’s ID into the After Slide ID field.
This slide is based on the second slide’s answer so we will put “q2”.
We want this slide to show only if the form user has chosen “Phone”.
12. Set the field Has Value equal to one of the answer values of the previous slide.
Has any Value – For more information on what that does see the section titled “Creating Multiple Branches” below. For now you can ignore this option.
In our example we will put “Contact by phone”.
This field is case sensitive and the value should match completely to the value you added to the answer in question 2.
13. Create a new slide just like the previous conditional slide.
In this new slide the question will be “What email address should we use to contact you?” and we want it to show when slide ID “q2” has the value “Contact by email”. This new slide ID will be “q3b”.
Now we can create a submit slide to do something with the collected answers. You can definitely create more slides gathering more information or skip adding a submit slide altogether if you just want to provide links or display conditional content.
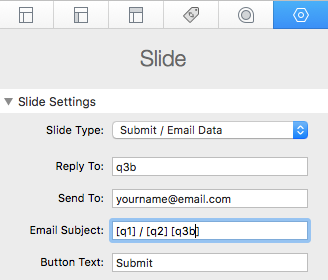
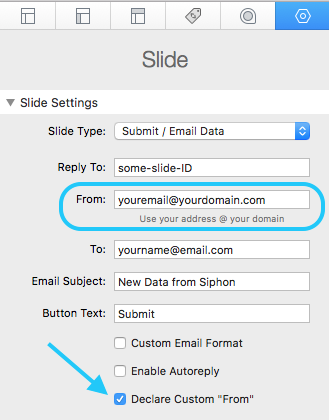
14. Add a new slide and in the slide’s settings panel, change the slide type to “Submit / Email Data”.
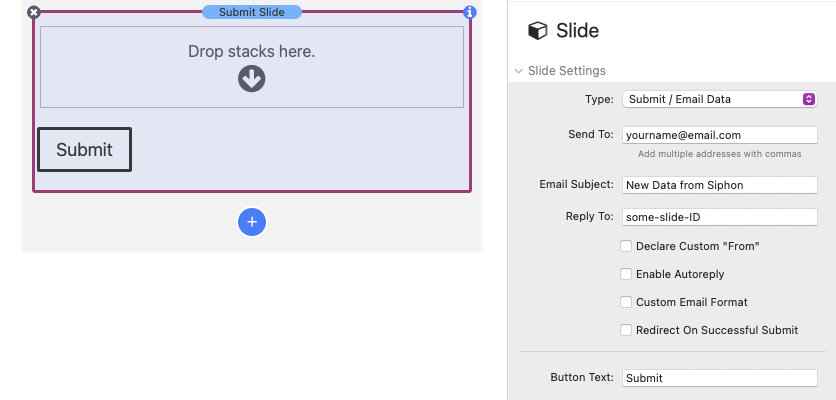
This will remove the Question field and add a submit button. When form user click the submit button all of the chosen and filled in answer values will be emailed to the address you provide.
15. Set the Send To field to the address you want to receive the form data. You can also change the Email Subject to whatever you would like as well as the Button Text.
16. While still in the settings panel, set the Reply To field by using a Slide ID from a corresponding slide that has an email address value.
In our example slide “q3b” will have the form user email address.
Note: Our example is just to teach you how to set up Siphon. You may want to make sure every form user provides an email address, not just those who want to be contacted by email.
We now need to create a final slide to show once all other slides have been filled out and submitted.
The Declare Custom “From”, Enable Autoreply, and Custom Email Format checkbox options can be ignored. You can find more information about them below.
17. Add a new slide and in the slide’s settings panel, change the slide type to “End / Complete”. This is a blank slide that you can add any stacks content to. This slide will only display if the submit slide has successfully sent the message.
Note: No error will display if you have entered in an email address wrong. Be sure to check your Send To field for spelling errors.
18. Finally, you can click on the outer Siphon stack to open the styles settings panel. Refer to the “Settings Panel Breakdown” section below for more information on styling.
Siphon includes an example file showing you how a simple contact form is set up. If you need to re-download the example file you can use this form.
Settings Panel Breakdown
Content Layout
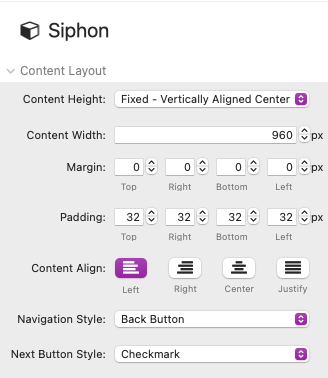
Content Height – There are three options to choose from. The two Fixed options will make Siphon same height as it’s largest / tallest slide. The third option Dynamic will adjust the height of Siphon to match the currently active slide.
Content Width – Set the a limit to how wide the content can be. The content will be centered with equal padding added to the left and right if the browser window or parent stack is wider than the set amount.
Margin – Adjust the space outside of the Stack.
Padding – Adjust the space inside of the Stack.
Content Align – Set the text alignment of the content inside of Siphon.
Navigation Style – Choose between two options. Back Button will place a arrow button at the bottom of each slide to allow users to back up to the previous slide. Pagination will place clickable bullets at the top of the slide allowing users to navigate to any previous slide in a single click. Note: Because Siphon slides are not static and the slides used as well as the amount of slides there are can change depending on how a form user interacts with the form, the pagination bullets will reset any time a form user makes a change to their input and re-submits a slide. All previously inputed data will be maintained however.
Next Button Style – Set by default, Checkmark will display a checkmark graphic inside of the button. Custom Text will replace the checkmark graphic and allow you to place any text inside the button. Note: When the Custom Text option is enabled, the Input Field’s special built-on submit (demonstrated below) button will be removed.
Default Next Button (Checkmark only):

Custom Text Next Button:

Slide Background Styles
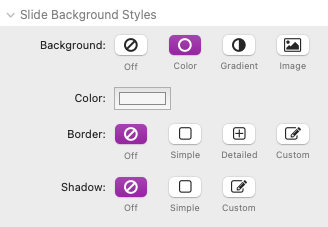
The background styles are mostly self explanatory and function much like the built-in stack background settings.
Background: Gradient – If the background has been set to gradient, you can animate it by enabling the “Animate Gradient” option. This will cause the background to move slowly back and forth in the direction of the gradient.
Background: Image – If the background has been set to image, you can make it so the image does not move when the page is scrolled adding a parallax style effect by settings Attachment to “Fixed”.
Question Styles
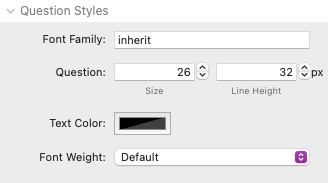
The question styles are mostly self explanatory. These settings only affect the question text found at the top of each slide.
Answer & Text Styles
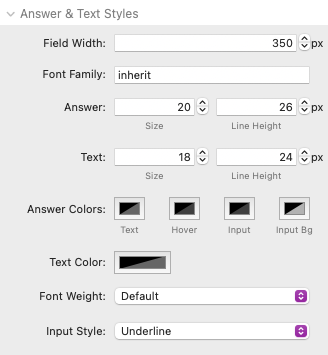
The answer and text styles are mostly self explanatory. These settings affect all the text inside of the slides.
Answer Colors: Hover – This setting affects the color of the answer elements when they are hovered.
Answer Colors: Input – This setting affects the color of the text inside the input elements when they are filled in.
Answer Colors: Input Bg – This setting affects the color of the background of the input elements.
Input Style – Change the style of the input fields from underlines to boxes.
Experimental Features
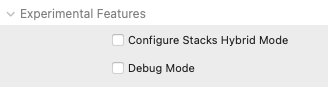
Configure Stacks Hybrid Mode – This experimental feature requires the Configure stacks (sold seperately). It will switch the stack into a hybrid mode that combines the features of the Configure stacks with Siphon. Refer to the “Configure Stacks Hybrid Mode” tutorial below for to learn mo
Debug Mode – If you are having trouble with the Stack, you can enable this mode to have the console display a log of what is happening step by step. We only recommend enabling this option when contacting support to help resolve an issue.
Answer Type Descriptions
Text – Create a simple clickable text link. If this link is clicked, Siphon will automatically advance to the next slide and the field’s value will be applied to the Slide’s Short-Code (See “Using Short-Codes” below for more info).
Content – Create a simple clickable link out of an image, button Stack, or any other 3rd-party Stack. If this link is clicked, Siphon will automatically advance to the next slide and the field’s value will be applied to the Slide’s Short-Code (See “Using Short-Codes” below for more info).
Input Field – A basic input field that allows form users to provide numbers, email addresses, or a short amount of text. The input field has a built-on confirm button that displays once the field has been focused. You can make the confirm button always visible by using the “Always Visible Confirm Button” option in the Settings Panel.
Text Field – A basic input field that allows form users to provide large amount text. The input field has a built-on confirm button that displays once the field has been focused. You can make the confirm button always visible by using the “Always Visible Confirm Button” option in the Settings Panel.
Checkbox – A clickable checkbox that does not cause Siphon to automatically advance to the next slide. If the checkbox is checked, it’s value will be applied to the Slide’s Short-Code. If the checkbox is left unchecked, it’s value will be blank. Note: The Checkbox uses Font-Awesome Icons and the Font-Awesome Stack must be added to the page in order for checkbox to display.
Radio Button – A clickable radio button that does not cause Siphon to automatically advance to the next slide. Radio button’s can be group together by giving them matching “Radio Group ID”s in the Settings Panel. Only one Radio Button can be enabled per group. If a radio button is enabled, it’s value will be applied to the Slide’s Short-Code relative to the Radio Buttons position in this slide. If the radio button is disabled, it’s value will be blank. Note: Each Radio Button acts as it’s own input field that has it’s own short-code. See the tutorial “Using Multiple Answer Types in a Single Slide” below to learn how to get the short-codes for slides with multiple inputs.
File – This input is solely for allowing form users to upload files. Note: This Answer Type does not serve well in the case of displaying values or advancing to conditional slides.
Using Short-Codes
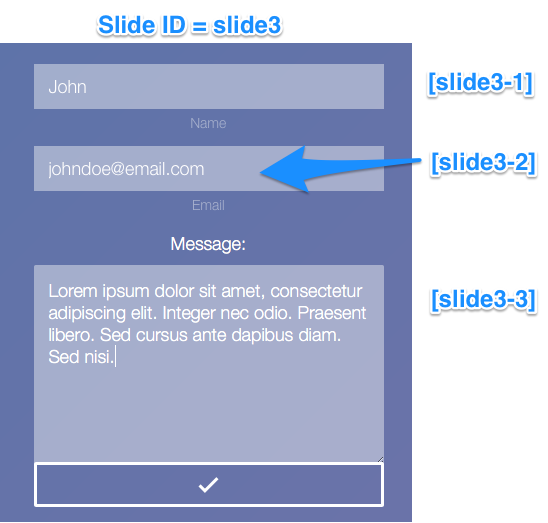
To Display a Previously Given Value – Take the Slide ID (of slide that contains the value you want to use) and wrap it in brackets [ ]
For example, if I had a slide with the id “slide3”, I would place the short-code
[slide3]
anywhere text is accepted in any following slide. That short-code will be replaced by the value given by the form user.
In the Submit / Email Data Slide – You can also use short codes in the From and Email Subject fields of a Submit / Email Data slide. If you have a slide that collects the form user’s email address use that slide’s ID in the Reply To field. Do not include the brackets when placing the slide’s ID in this field. You can also include multiple short-codes in the Email Subject field to help you quickly identify the contents of the email message.
Using Multiple Answer Types in a Single Slide
You are able use multiple Input fields, text fields, checkboxes, radio buttons, and files in a single slide. However, you cannot use any Answer Type that is tagged “Submits on click” as these options will automatically navigate to the next slide if clicked.
![]()
Multiple Input Field Short-Codes
When you want to create a short code for an input field value that comes from a slide with multiple Answer Types, you will need to reference which value you want to use by adding a dash (-) followed by a number representing it’s placement order. For example, If I had two input fields and one text field in a single slide, and I wanted to get the value from the second input field, my resulting short-code would be
[slide3-2]
Creating an Autoreply
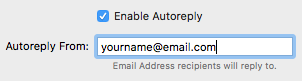
When setting the Slide Type to “Submit / Email Data”, you will have the option to send an automatic reply message when a user submits the form.
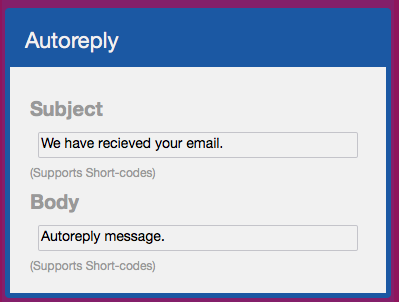
Add your email address to the “Autoreply From” field to allow users to reply to your automated message. You can add a value like “No-reply” if you do not want users to be able to reply to the message. The subject and body fields support short-codes so that you can add information gathered by the form (like a name for instance).
In order for the autoreply to work one of the slides must have collected an email address from the form user. That answer type should have the “Validate as Email Address” option enabled. The autoreply will send the message to the email address provided in this field.
Custom Email Formatting
The “Submit / Email Data” Slide Type will send a message with the user’s answers to the email address you specify. By default, when a user submits the information, the message sent to your email will contain all the answers given by the user separated line by line. To create a custom layout and to make the email more readable for your specific needs you can enable the “Custom Email Format” option.
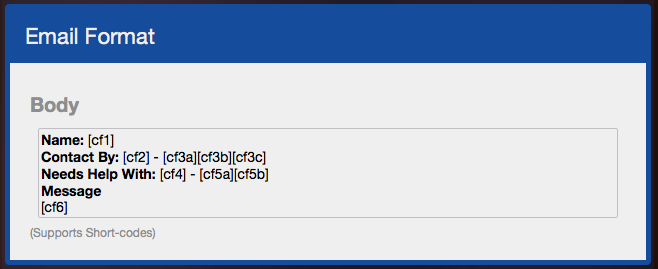
This will allow you to use short-codes to organize the slide answers, adding titles and grouping them together.
Email Troubleshooting – Submitting to an Address Not Associated with Your Domain
Siphon includes an option titled Declare Custom “From”‘. Enabling this will allow you to set a value for the PHP email “From” Header. This is useful if you are having trouble getting your message to send to an address not associated with your domain. After enabling this option, place your domain email address in to the new field titled “From”.
Creating Multiple Branches
You to create multiple branches in Siphon with each branch having their own submit and end slides. This way you can combine multiple forms into a single Siphon Stack.
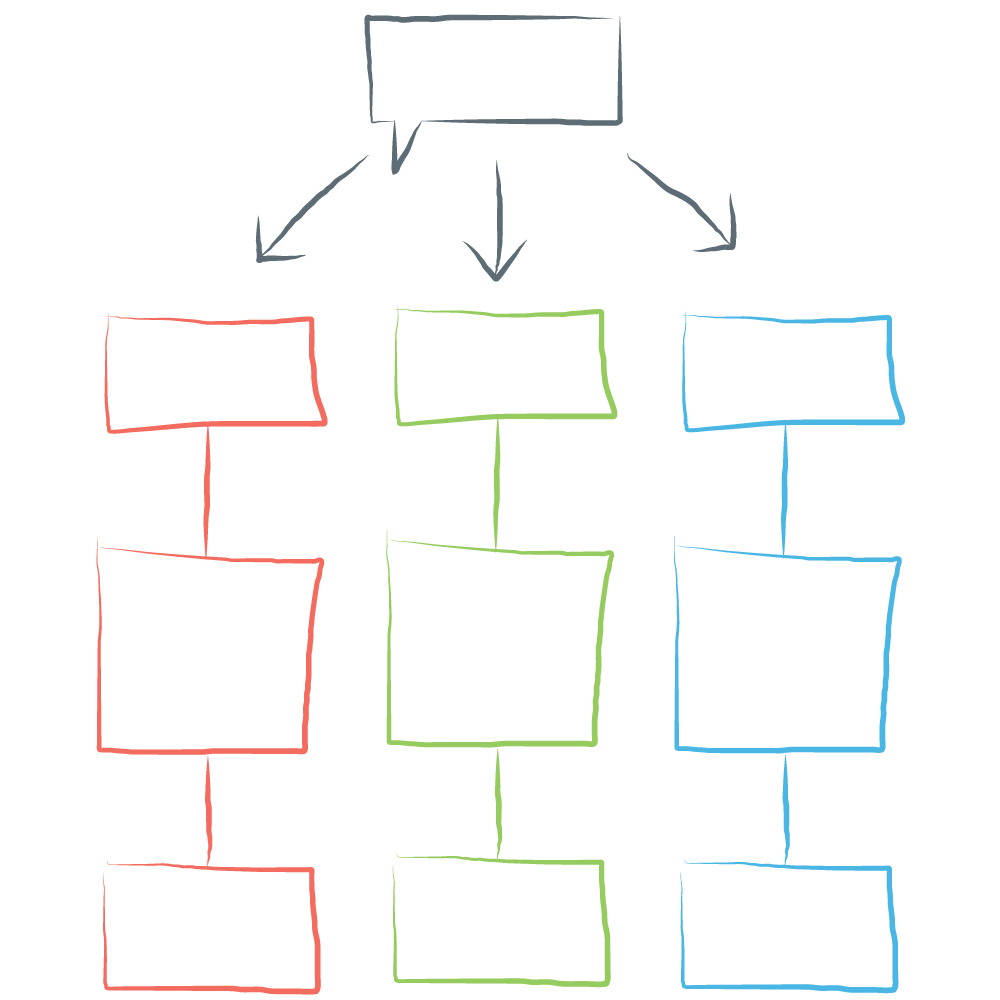
Lets say you wanted to create a multiple branch form like in the illustration above. The grey box shaped like a chat bubble would be slide ID: s1 while the branch on the left would be slides: red1, red2, and red3. We will ignore the other two branches as they will be set up the same way the red one will be.
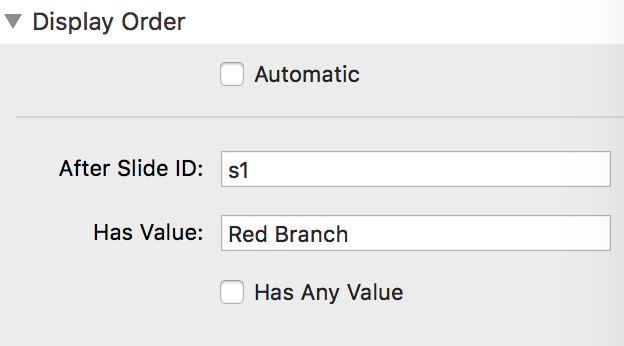
s1 would ask a question and give you three answers to choose from: Red Branch, Green Branch, and Blue Branch.
For slide red1 we will set it to display after slide s1 has the value Red Branch.
Slide red2 will then need to be set to display after slide red1 “Has Any Value”. The “Has Value” field should be left blank as it does not mater what value is given in slide red1, this slide will display always after slide red1.
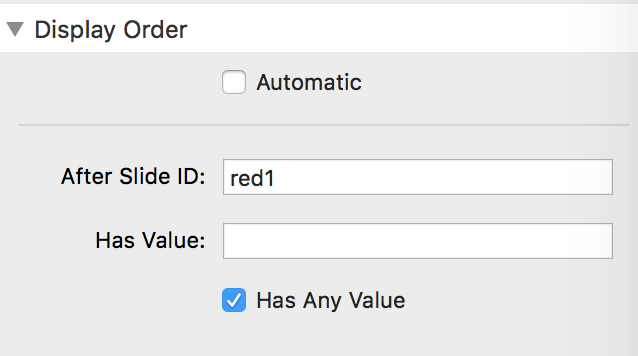
If we had set slide red2 to display Automatically it would have displayed regardless if slide red1 was displayed at all.
Slide red3 would then also need to be set to display after slide red2 has any value.
Siphon includes an example file showing you how to set up multiple branches. If you need to re-download the example file you can use this form.
How to Use the ‘If’ Stack to Display Conditional Content
The included If Stack can be used to show conditional content in a slide depending on how a user has answered a previous slide.
For example, you can show a coupon code to form users who input a value greater that 10 in previous slide. If we created a slide with the id “i1” that asks the form user how many t-shirts he wants to order, we could use the If Stack like so:

The stack functions as if you were reading it from top to bottom. In the above screen shot it would read:
“Show this content if slide key i1 is greater than 10 and (if) slide key i1 is less than 20”
Then whatever you place inside the “Drop stacks here” section would only display if the form user says he is going to be more than 10 t-shirts but less than 20.
Note: This Stack would need to be placed in a slide after the slide with the ID “i1”.
Siphon includes an example file showing you how to use the “If” Stack. If you need to re-download the example file you can use this form.
Configure Stacks Hybrid Mode
Setup using hybrid mode is mostly the same with a few notable differences and added features:
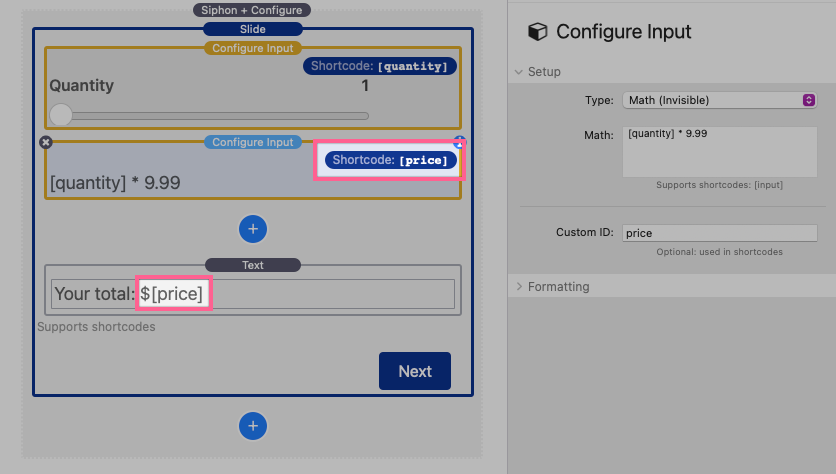
- Slides no longer have IDs or associated shortcodes. Instead, Configure input fields are used to store and display data. This is beneficial because Configure can manipulate/calculate with that data.
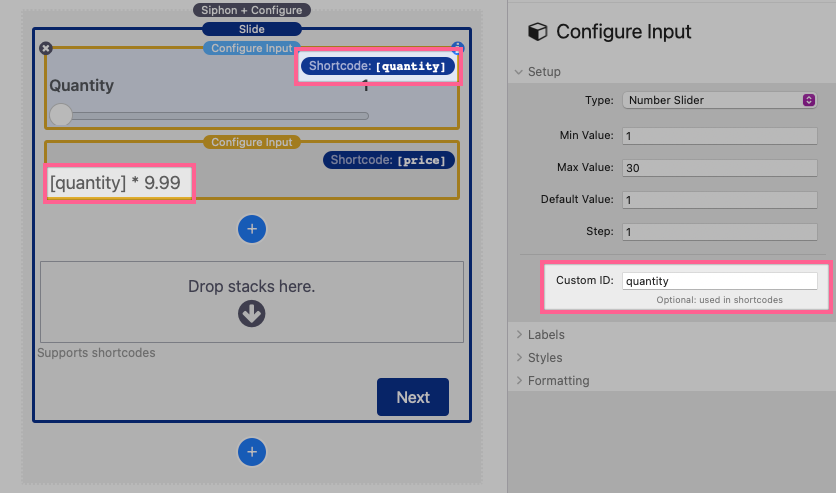
- Configure input shortcodes can be used in the same slide they are defined and will update instantly as the corresponding input field is changed.
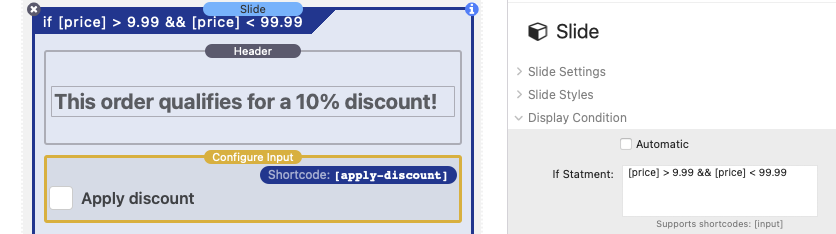
- Slides will always display in order. Display conditions are used instead to skip irrelevant slides by defining if statements.
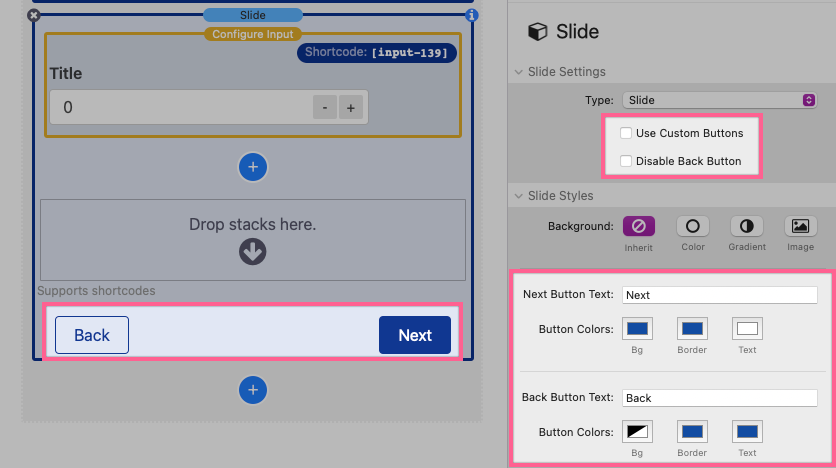
- Hybrid mode uses next and back buttons to progress through slides. The back button can be disabled per slide. You can also optionally use custom buttons in place of the default buttons.
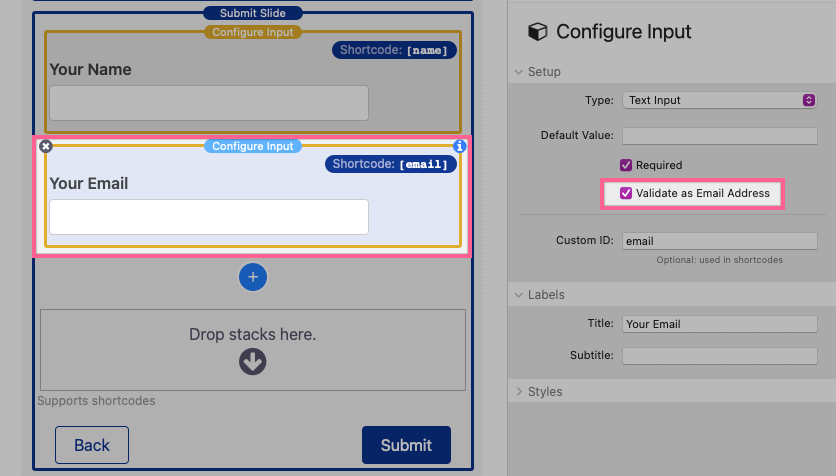
- For submit slides, the reply-to field is defined automatically by any input set to “validate as an email address”.
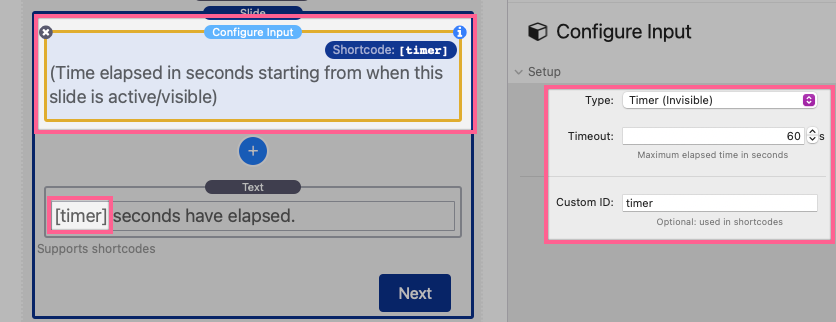
- A special Timer option is available in the Configure Input stack. This hidden field keeps track of time in seconds from the when the slide is first visible till a definable maximum length of time. The shortcode can be placed in a slide to be used as a visual timer, or placed in an email message to display a length of time. It can also be used in any if statements to create time based display conditions.
This mode uses the Configure stacks (sold seperately). Please refer to the Configure stacks tutorials if you need to learn how to use them.
Using AJAX to Submit to a PHP File For Data Processing (Advanced)
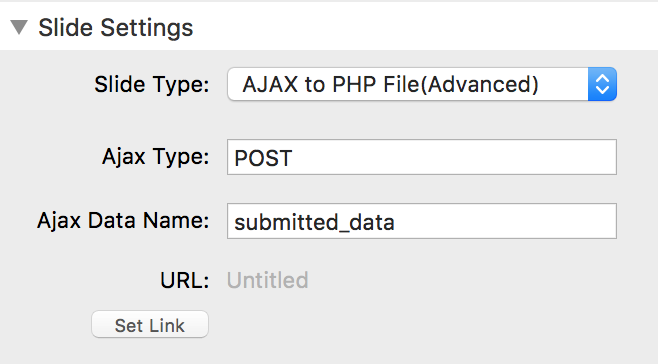
This Slide type is meant for those users who know a little about PHP and have or will write a custom script to handle the submitted form values. The values will be posted to a custom URL. The posted values can be used like so:
<?php
$data = $_POST["submitted_data"];
?>