Setup
1. Drag and drop the Quick Finder stack into the Stacks editor.
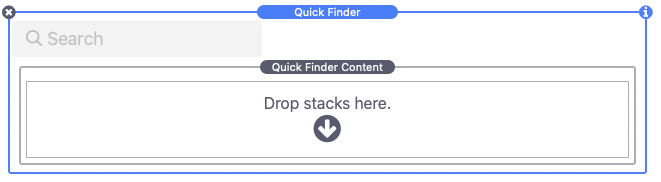
2. Next, place the content that you want to be searchable inside of the Quick Finder Content stack. Quick Finder treats each nested stack as one single item. So if you put Stack A inside of Stack B, it will treat Stack B as a part of Stack A. If you want Stack A and Stack B to be individual items, place them each within the content stack, but not within another stack or with one inside of the other.
Here’s a visual representation:

3. The Quick Finder Content stack does not need to stay nested in the Quick Finder stack and can be dragged and placed in another location.
4. Select the Quick Finder stack and in the settings menu navigate to the Settings tab and select a Search Function to determine how the stack will handle the search bar input.
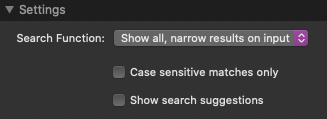
Search Function: Show all, narrow results on input
The stack will show all items when the search bar is empty. When a user adds text to the search bar it will hide items that do not contain the current search term or phrase.
Search Function: Hide all, find results on input
The stack will hide all items when the search bar is empty. When a user adds text to the search bar it will show items that contain the current search term or phrase.
Search Function: Show all, sort all on input
The stack will show all items when the search bar is empty. When a user adds text to the search bar it will sort all items with those that contain the current search term or phrase at the top.
5. Optionally enable case sensitive matches.
Case sensitive matches only
When enabled, the search will only find a match when the searched term or phrase is exactly as typed with upper and lower case characters.
6. Using the next option, we can enable search suggestions to make sorting through items even faster. These suggestions will show below the search bar when it is focused. If a suggestion is clicked it will automatically populate the search bar and execute a search using the predefined term or phrase.
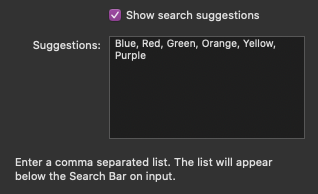
Show search suggestions
When enabled, a textfield will display. Here you can define your search term or phrase suggestions in a comma separated list.
7. In the settings menu Search Input Styles section you can change the appearance of the search bar. The customization options are all pretty straight forward and will only affect the appearance of the stack.
8. There are also style settings for the Quick Finder Content.

Max width
The Quick Finder Content stack will automatically fill the width of the stack you place it inside of. Use this setting to define a maximum width you want the items to display.
Columns
Define how many items you want in a single row based on screen size. There is also a forth input for setting (Gap) the distance in pixels between each of the items.
Highlight search terms
When enabled, every term or phrase that is found in the items will be highlighted with the defined colors.
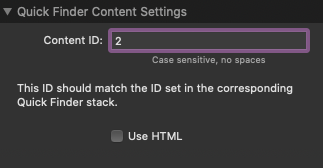
9. Lastly, in the Advanced section you can define a unique ID. This ID only needs to be changed if you are using more than one Quick Finder stack on a single stacks page.
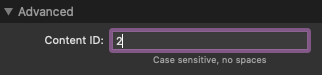
10. After you have added a new unique ID (it can be something as simple as the number 2), copy the ID and select the Quick Finder Content stack. In the settings menu, add the ID to the Content ID field. This will assign the search bar to this content.