How To Setup Parallax Flight and Parallax Flight 2
Step 1: Create a new Stacks page.
Step 2: If you want to create a one page site with the included Theme Wrap Stack, drag and drop the stack into your editor. This will overwrite the theme you have selected. (If you just want to use the standalone stack inside of another theme skip to step 4)
Step 3: You can now adjust some of the settings for the theme. Leave your mouse pointer over a setting to get a description of what it does.

Step 4: Drag and drop Parallax Flight or Parallax Flight 2 into the Theme Wrap Stack or into the editor if you are not using the Theme Wrap Stack.

Step 5: Add any content or other stacks into the Parallax Flight section. If you do not wish to add content, you can use the “Y Padding” Setting to adjust the vertical size of the stack. In the example below I have added a 3 column stack with text in the right column.

Step 6: Select Parallax Flight to begin adding your background images. Locate the image or images you would like to use as a background.

Step 7: (Parallax Flight 2) Drag and drop your images into the Background and Foreground sections (Foreground images need to be PNG files with transparent parts, the Foreground image is optional). You can now adjust the start and stop positions of your background, foreground, and content sections. Each of the three sections have x and y values for start and stop. You can enter any value followed by “px” (pixel) do not leave any spaces between the number and “px” (Example: 340px). These input fields also accept the value “center”. This allows the images to be horizontally or vertically centered, however the start and stop position must both have the value “center” for it to work (Example: Start x = center start y = 0px, Stop x = center stop y = 600px). If you need help visualizing where the images will be at start and stop use the Preview Option.
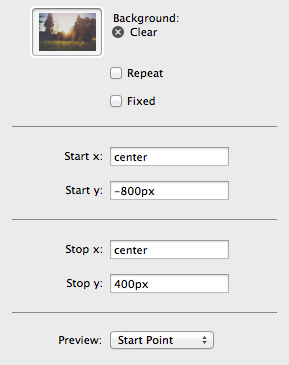
The “Fixed” checkbox will ignore your start and stop values and force the image to be fixed position while the page is scrolled (Note: This option is not compatible with mobile devices).
The “Repeat” Checkbox will make your image repeat in all directions, this is useful if you are using an pattern image.
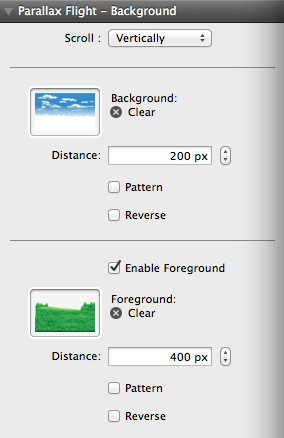
Step 7: (Parallax Flight) Drag and drop your images into the Background and Foreground sections (Foreground images need to be PNG files with transparent parts, the Foreground image is optional). You can now adjust the scroll speed of each image. Set a pixel value equal to how far you would like the image to move as a visitor scrolls down your page. If you set the value to 300px, the image will move once it is visible in the browser window until it has moved 300px by the time the stack is no longer visible in the window. If you are creating a landscape, you want the objects that are supposed to appear farther away to scroll slower that things that are closer, the lower your pixel value the slower your image will move. I recommend adding padding to the top and bottom of the Parallax Stack using the “Y Padding” slider. This will increase the view-port of the background images you have added. If you are using a pattern click on the pattern checkbox to have the image repeat. You can also reverse the direction of the scroll by selecting the Reverse option.
Those who are not using the Theme Wrap stack can enable the “Force Full Width” option to make the stack fit the width of the browser window. *This may not be compatible with all themes
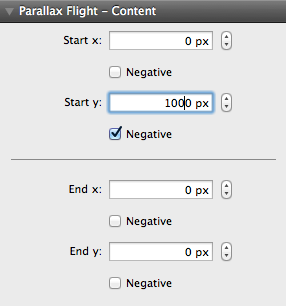
Optional: (Parallax Flight) You can adjust the start and ending positions of the Stacks you add to Parallax Flight in x and y values. In the example below I have set the start y position of the content to negative 1000px. This will cause the content to be 1000px to the left of the browser window and will not be visible at first. Since I have not adjusted the ending position the content will slide in to view as the visitor scrolls down the website.
Step 9: If you preview your page at this point you will notice that the parallax is set up but the site does not have enough content for you to scroll. If you can’t scroll then the parallax effect is lost.

So we need to create more Parallax Flight sections to make our page longer. I recommend adding padding to the tops and bottoms of each section you add to help give your page length.
If you are using the Page Wrap Stack it is important for you to make sure each new section is inside of a new Parallax Flight Stack. This will allow the theme to locate where to scroll when users click on the navigation buttons.
Parallax Flight Wrap
> Parallax Flight
> Content and other Stacks
> Parallax Flight
> Content and other Stacks
> Parallax Flight
> Content and other Stacks
> Parallax Flight
> Content and other Stacks
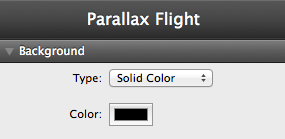
For sections that you do not want to have a parallax background, use the background option to give it a solid color.
Step 10: After you have added enough sections, you can preview the site and adjust settings until you get your desired look. If you are using the Theme Wrap Stack your navigation items will automatically link to your Parallax Stack sections in order. You can change the titles of each section by selecting them in the editor.
Additional Options (Parallax Flight 2)
Start Point Most of the time you will want to leave this option on default. This option is only for when Parallax Flight is visible when the site is loaded (Its located at the top of your page). By default Parallax Flight starts to animate as soon as the top of the image enters into the browser window, but since the image is already in the window on load, the animation will start half way through. So if Parallax Flight is at the top of your site set the Start Point to “Top”. If it is not at the top of the site but still visible on load you can select “Center”.
Loading Color This color options lets you set the color of the background. This color will only display while the images load and fades out after Parallax Flight has finished loading.