Geo Location Tags (or Geo Tags) are topographical markers (longitude and latitude) that identify your website’s geographical location. In other words, they show search engines where your business is physically located. In my opinion they’re not extremely important when you compare them to directories like Google Places that actually require you to verify your existence at the location by mailing you a postcard with a code – obviously the search engines will trust those addresses more. However, they are still recommended by search engines and do play a role in the growing amount of online tools, such as mobile apps. In conclusion, they are simple to add and likely will only help, not hurt, your business if you rely on local customers.
If you were using a text editor the code for adding geo location tags is very simple. Finding the coordinates for the location used to be the tricky part, but with the abundance of geo tag generators even that process is easy now.
My favorite geo tag generator is MyGeoPosition.com due to its abundance of data, though there are plenty of others that are often far simpler to use. If you don’t like the one I use in this tutorial or are just curious google “Geo Tag Generators” and I’m sure you’ll find a large selection to choose from.
For this example I’ll use an office space in the town I live in. 3830 Watt Ave, Sacramento, CA 95821.
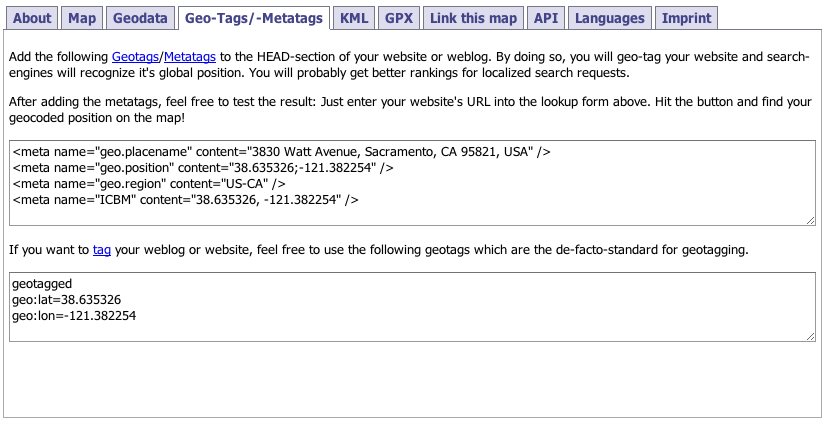
After hitting the “Calculate geodata” button you should see a familiar map, well… familiar when it’s your address of course. However, the data we’re looking for is in the Geo-Tag/-Metatags tab.
Pretty much every thing in the first box is what we’ll use – so all those staring with <meta…>. Unfortunately we cannot just copy and paste the data, though it is very simple to enter into your RapidWeaver page at this point (you must enter it into every page you wish it to be displayed on, though I would argue you only need to for your home page).
Navigate to the Page Info > Header section in edit mode of RapidWeaver.
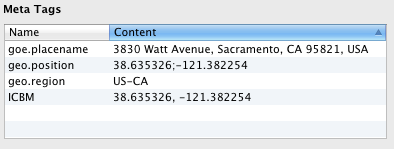
For adding each meta tag hit the plus (+) button in the bottom right corner. The tag will already be assigned the meta tag portion so simply add the name and content separately (don’t worry about any of the tags or quotation marks).
That’s it. If your’s looks pretty much like that then you’re finished. Pretty easy.


