Found in the top right of RapidWeaver’s Edit Mode is the Setup button (CMD + K), which displays the drop down menu (see below) when selected.
Note the 3 different options at the top of the drop down menu, which can be selected when editing the sections discussed throughout the steps below. 
General Settings
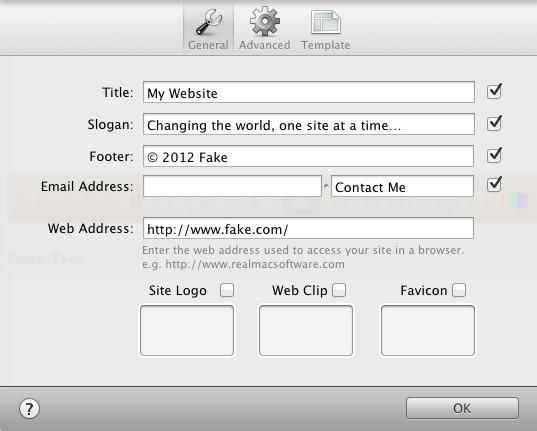
The Title which is what will display in your website’s title located in your website’s header. Your Slogan will typically display right below or beside the Title unless left blank (depending on the theme’s design). The Footer will display as the section at the very bottom of your website.
For more advanced users it is worth noting that these sections can read HTML code as well should you wish to include more data, though it can be cumbersome to navigate if there is too much coding as these fields do not grow in size when there is more data. The e-mail address is the e-mail that will be located in your Footer, not to be confused with the e-mail address you assign on your Contact Page.
Note that each of these 4 sections has check boxes to their right. By default they will be checked, though by unchecking them you can remove them from being displayed on your site. In the Web Address field list your complete web address, though this does not mean to specify where on your server you are uploading the website files (that is covered in the Publishing a Website section).
The Site Logo displays your logo in a spot that is specified by your theme’s design. Simply drag and drop the image file into the field. This will place a check in the checkbox, which if unchecked will hide the logo
A Web Clip or WebClip image is a website bookmark image specifically for iPod, iPhone, and iPad devices. This image is to be a 57 x 57 pixel PNG file. Simply drag and drop the image file into the field. This will place a check in the checkbox, which if unchecked will hide the logo.
The Favicon is the small image that is displayed differently depending on the browser you are using, but typically displays next to your website’s URL, in a top tab section for more modern browsers and in the next to any Bookmarks your user’s make while on your website. The image size is typically 16 x 16 pixels or 32 x 32 pixels. Simply drag and drop the image file into the field. This will place a check in the checkbox, which if unchecked will hide the logo.
Advanced
Although this book is not aimed to address advanced topics, there are some important ones that should be addressed here. The image above displays the default settings, though some of these boxes may be worth checking.
Displaying breadcrumb trail. Breadcrumbs are a series of links that specifically help users when navigating backward in your website. If they were to travel two or three pages into your website it is often very nice to have a breadcrumb trail so that can go back a page or two versus all the way to your home page. Sure they could navigate to the page in your navigation bar’s dropdown menu, though they may lose track of where they are and it can simply be quicker with a breadcrumb link. I recommend the use of breadcrumbs, though only if your site has a lot of content that is three or more pages in depth.
Generate XML sitemap. This is particularly important for SEO purposes and will be addressed more in the Search Engine Optimization section, Sitemaps section and I highly recommend keeping this checked.
Enable Cruftless Links. Checking this box changes your URL structure in a way that hides the file extensions. By default RapidWeaver will place newly created pages inside of a folder and name the file index.html. In order for cruftless links to work the file’s must maintain the name index.html and the name of the folder they are in will then be the URL (not the file name). It is argued that cruftless links help for Search Engine Optimization (SEO) since Google ignores the “.” between the file name and the extension. In other words, Google would read the words “about-us.html” as “about ushtml,” though I personally find it hard to believe Google would not have fixed such a problem with their searching algorithms. Despite the SEO issue, I find cruftless links nicer to look at and also easier for users to remember should they want to visit that page again by memory.
Template
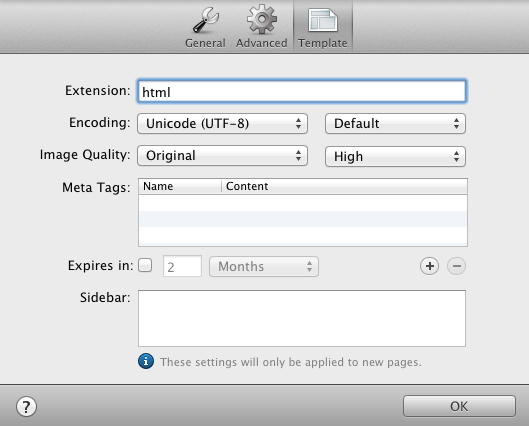
This section controls global template controls for your website. For most users this section is more advanced and the default settings will not need to be altered. Global sidebar settings can come in handy for many themes as the content will interact with certain Plugins such as “Extra Content.” Global Meta tags are preferred by many who want to ensure “Do Follow” or “No Not Follow” attributes to search engines, though by default entering nothing will allow search engines access to crawl your website. For locally based business setting up a geographical meta tag or “Geo Tag” is good practice and the global settings make it all the easier. Note that these settings will only have effect on page created after editing this section.
Customize the Top Toolbar (2nd Edition)
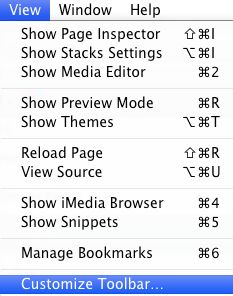
By default RapidWeaver’s layout for the top toolbar section is great for users ranging from beginning level to experts. Though, for those who get used to some of the keyboard shortcuts, certain icons may be preferred to be turned on or off. You can customize this section navigating to View > Customize Toolbar.
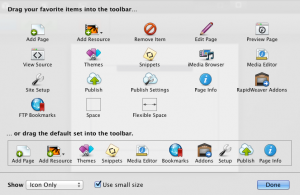
Easily remove and add icons. You can also switch between large and small icons (not a huge difference though). Also change between display the icons only, text only, or both icon and text (default).


